26

Finally, a comm for that one user who hand-makes longbows. This ones for you, comrade.
Hi comrades! I'm back! Sorry for the delay! I've been keeping busy, with this project, with work, and with getting familiar with a new town. This update is fun because it's actually entirely devoid of electrical engineering nerd shit! Since last update, I've focused on two things - getting the framework of a website together, and actually getting usage hours on the device so I can know how it handles, what it's missing, what it does well, etc. I'll break this update into those two sections.
I think I have about 5 hours in the device so far, with I'm guessing a couple thousand or so pulses. I've tested my face, eyebrows and beard, I've tested my hands, I've tested my arm, I've tested my leg, and I've tested my chest. The general routine is as follows:
Some areas are clearly not regrowing, others, it's too early to make a call, but I'm pretty confident that it'll be minimal, possibly even better than salon electrolysis, due to a number of advantages to self-work that I'm finding that I'd love to detail here. There are some cons too.
I also have some notes on equipment:
This isn't all inclusive, but I'm definitely happy to get thoughts down prior to starting work on the manual! which leads us to...
It's on jekyll now! We're finally ready to start hosting actual, real content there! So, so many thanks to @Edie@hexbear.net , who actually single-handedly ported the old single page splash screen to Jekyll and on top of that pushed out a bunch of fixes for my sloppy half-assed jekyll code. I really, really appreciate you, you're genuinely helping both to motivate me by both making indispensable contributions, and also just by being a person out there in the world doing this with me. 
The appearance and organization are both super preliminary, and there's not any actual content, and the design is also very much a prototype. The important thing is that now I (or anyone else!) can just write markdown and have it reflected online in an easily readable and shareable format. Email patches are a great way to get both code and content on the page, I try to review them at least twice a week or so. Now that things are set up, it's extremely convenient to put content up. I think to pilot the website, I'm going to make a more formal tutorial for the pencil based probe to start. The one I made per @YearOfTheCommieDesktop@hexbear.net's instructions is still doing phenomenally, thank you for your research and development. Similar thanks for being a part of the project in a meaningful way and making this a team effort.
Come take a look! https://sphynx.diy/
So the project is hitting a bit of a fork, where we finally have multiple parallel work streams at a time - the online manual needs to be designed/written, and the RC2 version of the PCB needs to be designed and ordered. I have a list of changes from working with the RC1 that I'll be rolling in, that'll be the next post. I'm also going to start using https://todo.sr.ht/ to track issues, both to keep myself organized and to publicly advertise what we need to get done in a neat encapsulated way. I'll have details for that up on an #8.5 post in a couple days. For now, honestly I feel bad for drastically overrunning my two week timeline and leaving y'all in the dark for so long, so this post is going up ASAP. I've been busier than usual and probably busier than I plan to be in the future, so I'm more optimistic for a timely #9 post, although that may be in three weeks and not two due to some plans of mine.
I love y'all. RC2 might be the release. We're just weeks away from other people benefiting from this project materially, it's just refinements from here. Thanks for the support, and you know the drill, stop by, say hi, ask questions if you want to understand things better, make suggestions, all of it. See ya next time. 

hello comrades! It's been a minute! I'm back with my first tech update since upending my entire life and getting re-settled! Let's talk 
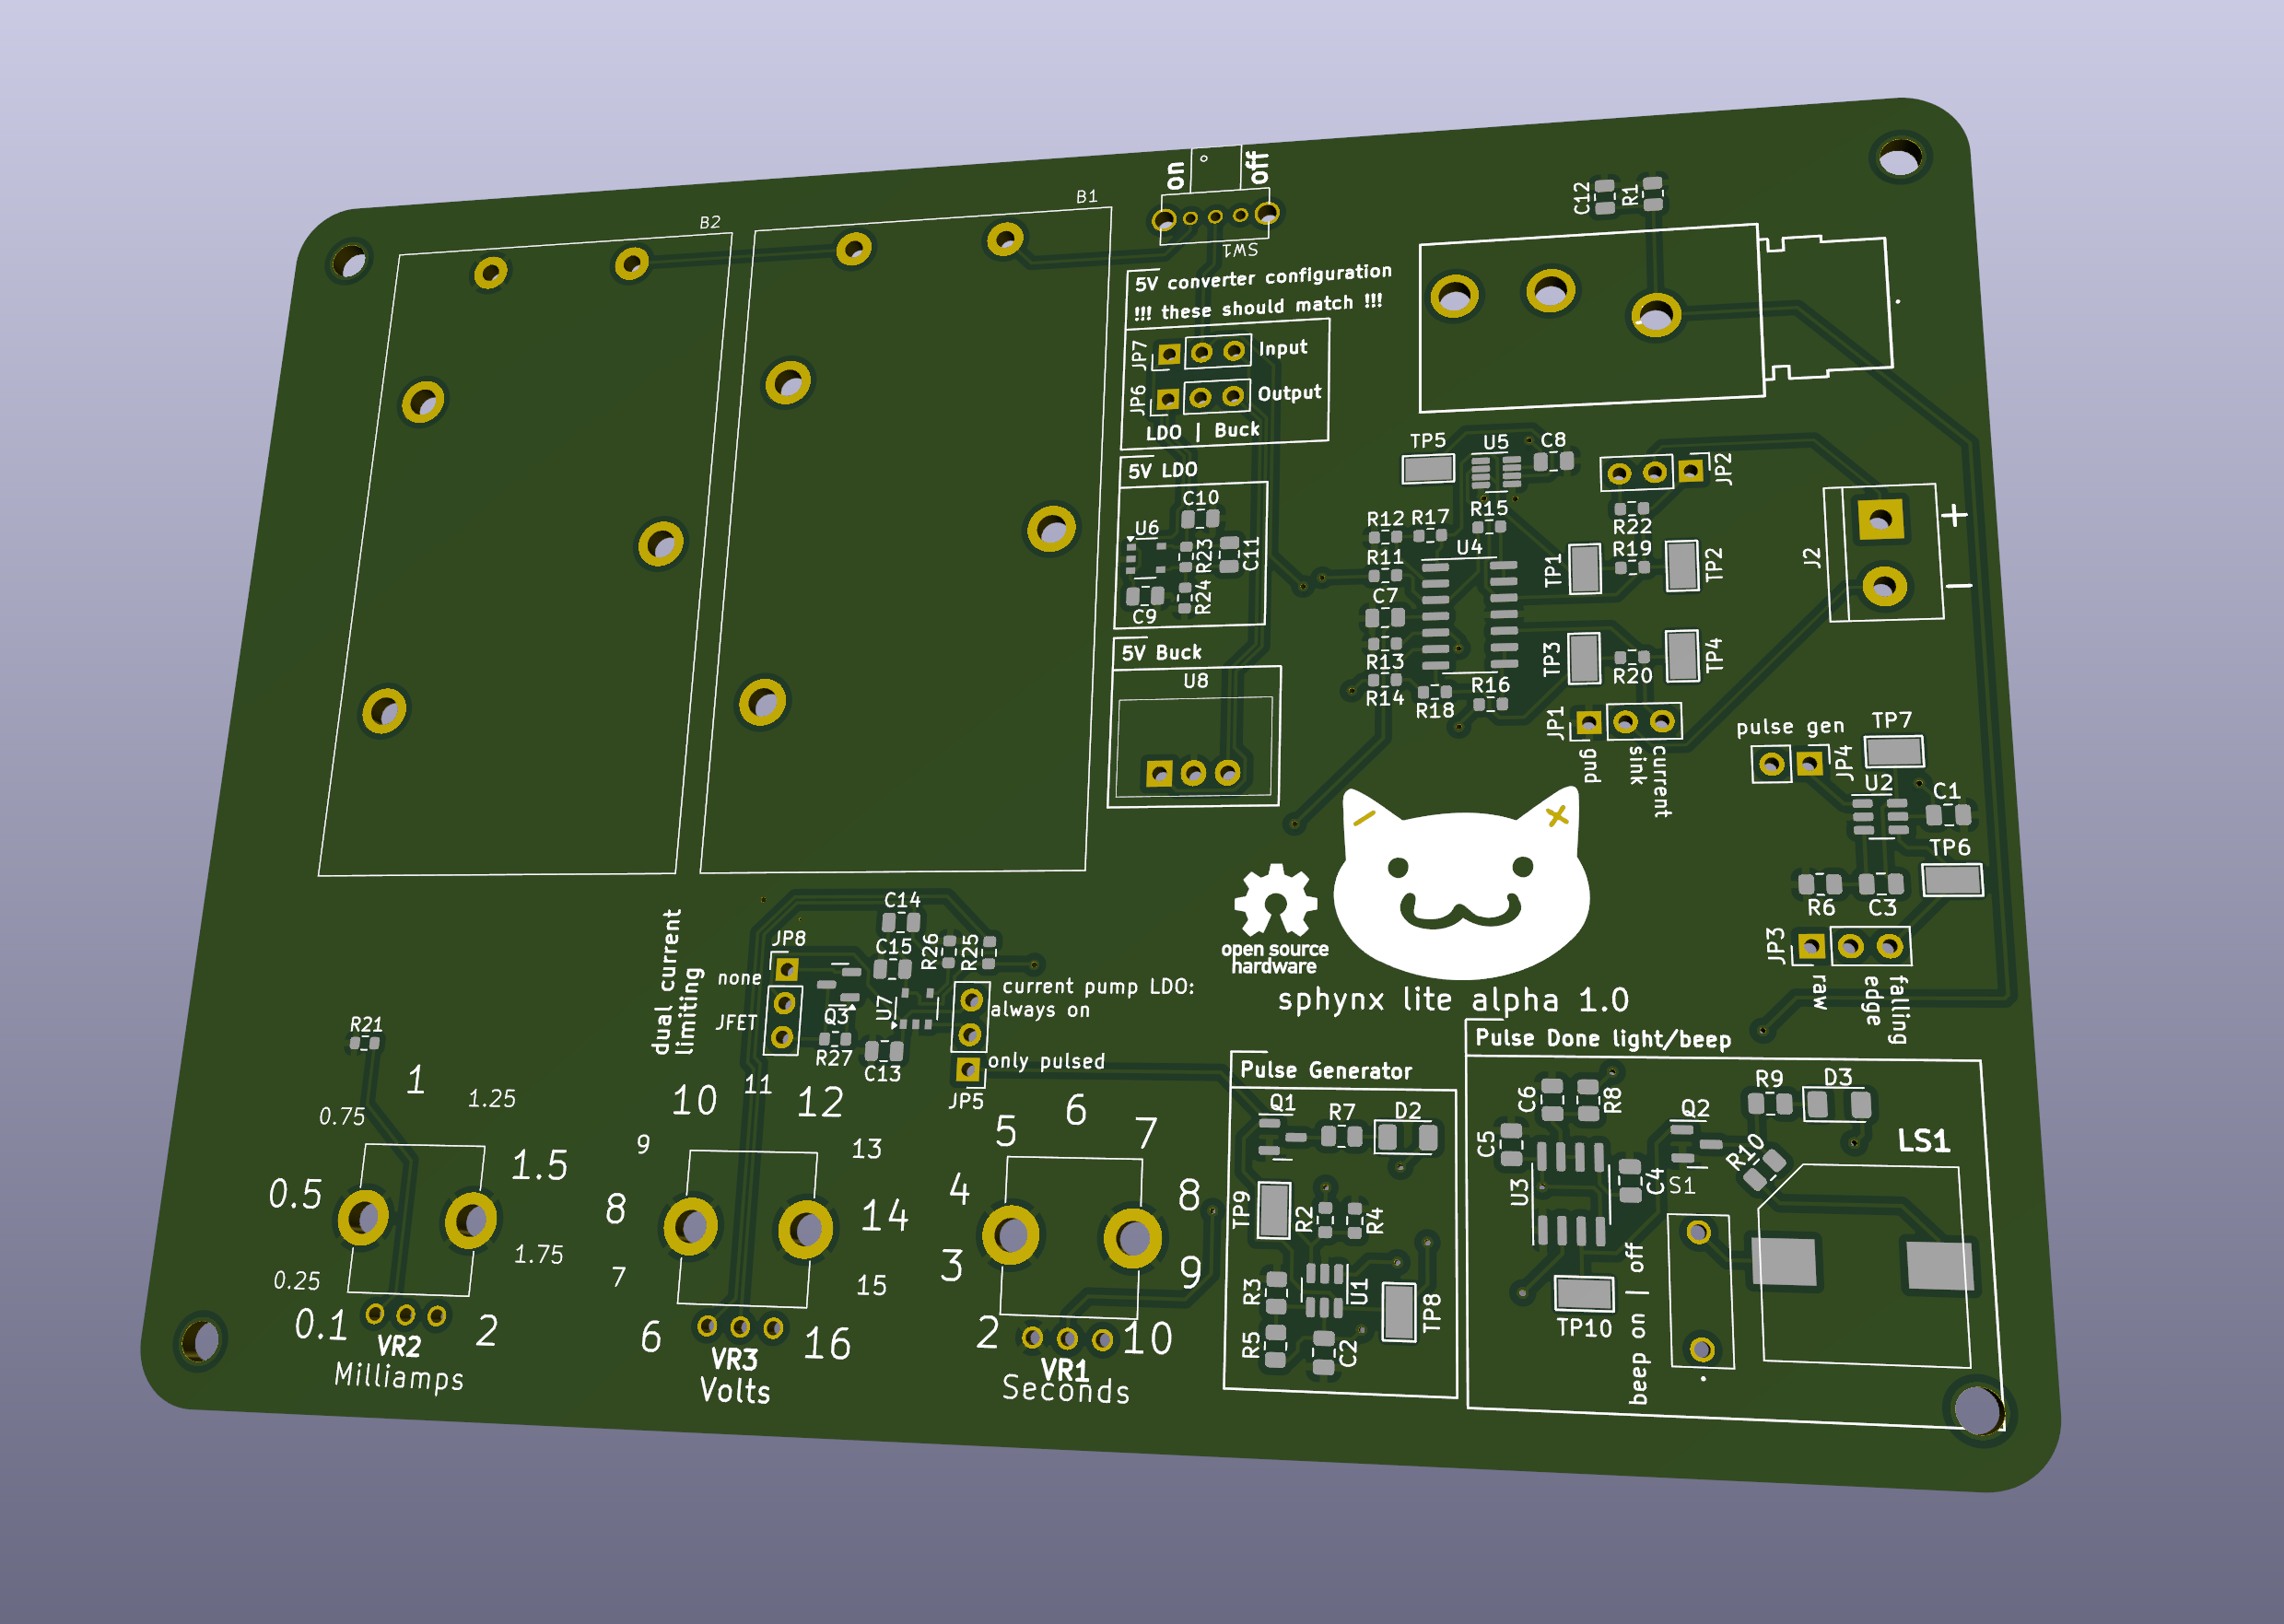
See for yourself, pictured is the first alpha of the Sphynx Lite. Schematics are on git, go check it out (and if you want to set up KiCAD to view or edit but aren't quite sure how, say so in the comments and me or someone else will help you out!)
Issuing guidance on the usage of these things is complicated. I'm always going to be a little apprehensive recommending that people use this, because I'm a very cautious person. For now, I think my official guidance is:
As it gets more mature and I revise and revise until I drop the alpha, I'll trust it more.
This was a push across the finish line. I optimized for getting something testable done with the correct topology, layout is a little dicey (cut off silk screen in the bottom right  ) and subject to change, I just needed something to test on. I was gone for over two weeks from my last post here, mainly because it was just a lot of work with nothing intermediate to report. But now it's here! This has all the working parts of the last boards merged into one, with the new additions of:
Oh, and I whipped up a cute lil logo. :3
I have a lot of really good work from y'all that I need to capture and incorporate. Particularly, my immediate plans while this board is fabricated and shipped are to:

The next post will be me building this out and reporting on how well (or whether) it works, and documenting changes for the Lite Alpha 2.
I also badly need to make a BOM. With some effort, anyone who's built a board together can buy all the parts for this and make one, but it'd be a thousand times easier if I just made a single cart that you can buy that includes every single component. If you want to make an alpha board for fun or debugging, maybe hold off until I have that out.
Honestly, those of you who are following this pretty closely have a good read on what's going on, what's needed, and what's upcoming - keep being interested! If anyone wants to make one, I do recommend waiting until I release a BOM, but very soon we miiight be at the point where other people besides me get one of these in their hands.
I could also use some polish on the logo. It's fine, but it could be cuter, and the lines are a bit funky. I'm going to put SVGs on git soon and if anyone feels like cleaning them up, rearrange the kitty cat face so it's cuter, fixing my wonky paths, let me know!
Also, and I simply cannot stress this enough - when I've been exhausted, when I've been deep in executive dysfunction, when I've been not feeling up for it, I've read through all your encouragement and support throughout the duration of this project and it's helped me to keep pushing. I would unquestionably not be this far without y'all. Thank you all so much.
As always, stop by, hang out, say hi, ask questions, tell me what you've been up to, design review me, however you'd like to be involved is good by me! I'm thinking I want to make the expected cadence of posts once every two weeks, just because I'm busy and I don't want to cause alarm when I miss a week. I can always surprise y'all with more frequent posts too.
P.S. - I have no hair regrowth in test areas. 
Hey friends
this week has been rough for this project, not gonna lie, I have a killer bug that I haven't solved yet (that I will likely solve as soon as I write all this out complaining about it, lmao) so I'm a little behind where I wanted to be. I also have a little bit of scope creep coming for me. Not a great week, but there was progress nonetheless. At least the good news is that there's no discernable hair regrowth in the one small area that I tested - it's only been a week or two, but it's reason for optimism!
Last time we spoke, I said I was gonna be designing and ordering the Lite Alpha 1. Sadly, I'm not there yet. I did implement fixes for all of the bugs mentioned in the previous post into the start of a Lite Alpha 1 schematic. Unfortunately, a lot of that was low hanging fruit. I have two more daunting challenges ahead of me before I can order boards and actually make a Lite Alpha 1. The first, which is really deeply killing me right now, is a bug, the second is a feature that I'm kind of deciding is necessary that I'll mention in new developments.
I wired the two boards from last time together to test as one unit, here's what it looks like:

Here's the bug behavior:
Next paragraph is kind of jargon-y word barf that I didn't bother to make explicit or clear or referenced to the design, sorry in advance, I partly just needed to complain, but: I'm worried it has something to do with the fact that the return line of the probe is technically not ground and instead a current sink floating just a little above ground. If that's an issue, then I need to idunno make a negative supply or something and I really really don't wanna. It could be a thousand other things too. My only big lead is that if I physically disconnect the Pulse line with that switch you see in the photo, it doesn't sink current any more, so it's probably something wrong with the digital timing board. The voltage appears to be 0 even with it connected, the light is off, and it's even tied down via the potentiometer on the current source board, not to mention the LTC6993 says it can sink current through the OUT pin so even if there is something driving it high it should get pulled low. The mechanism of action here is that the potentiometer that divides the voltage that goes into the current source input is driven directly by the pulse line. I'm completely lost. It doesn't help that I'm doing this all with nothing but a single multimeter to debug. I think I'm going to buy an oscilloscope for this. I've wanted one for like a decade now and this is as good of a reason as any. It delays things, but hopefully this will speed up all testing I do from here on out forever.
Oh, and I caught and fixed another easy bug - I noticed that every time I turned off my soldering iron, the board would trigger. Luckily I knew right away that that's a noise thing. I added a 1 uF capacitor filtering the pedal line to ground and I don't get false triggers any more. Cleaner pedal signal, one less source of false triggers. yay 
I've decided that if I go ahead with the design as it is now, operation will kind of be firing blind. The user has no way of knowing how much current or voltage is coming out. I really want to keep the Lite simple, but I don't think it's acceptable for the user to not know if current was even getting delivered through the hair follicle. So I think it's in order to add one more part to the design before making an Alpha to debug and iterate on. Basically, what I want to do is make a status light that goes on if you are delivering >90% (arbitrary and subject to change) of the current that the knob is actually set to so that the user can know if the device is working with each pulse. I'm lucky I put that current feedback instrumentation amplifier in the last design, I had a hunch it would be useful and now it is: all I need to do is compare the voltage on the input of the high-side current source with the measured current times some factor, probably done with another instrumentation amplifier on the middle leg of the potentiometer on the current sense board. If the current feedback is 90% or higher of where the set voltage has it set to be, the light comes on. It adds a few parts and some complexity, but in testing, I was finding that moving around, having a bad insertion, or any number of other things could make the current drop and deliver an incomplete hair kill, and without a light or an ammeter hooked up, the user has no way of knowing whether each pulse works, and an entire session could turn into wasted time. I hate to make things more complicated when I'm already having problems, but I think this one is necessary.
Outside of electronics, last time, @lilypad@hexbear.net mentioned that sourcehut has a site hosting feature - thank you lilypad! You're so right and I set it up and put up a splash screen and I think this is a good solution! She also mentioned that printable manuals are probably a good idea - I 100% agree, my thoughts for this were to ensure that whatever site generator we use, should we make our own theme, we make sure that it's print-optimized. Static site generators usually have Markdown-based pages and that's also compatible with Pandoc, so it'll probably be pretty doable to get them over to LaTeX too for that beautiful, beautiful formatting. Good looking out 
@ComradeEd@lemmygrad.ml also did a lot of good thinking about static site options in the comments last time - thank you as well probably gonna link its post down below in the comments when we talk about how to make a site!
Also - shout-out to @YearOfTheCommieDesktop@hexbear.net for their amazing work figuring out a probe design in the comments of the last post! I haven't started building one out myself yet but I have some of the parts on the way in the mail and it looks like their work will probably be the basis for a needle holder probe, something that's necessary before we can fully release a Lite. Thank you bestie
Obviously I need to fix my bug and implement my feature. Besides that, there's not much else to mention in electronics. It's still too early for enclosure stuff, and the electrical design is too much of a moving target to start trying to port to JLCPCB, so I just have to fight through this one. All other new developments outside of me bashing my head against these two new problems will be in both the site and the applicator probe.
I think it's time I opened up site development to interested parties? We're not in a rush but it's on the table! If anyone wants to mess with Jekyll/Hugo/something else and sourcehut's build system, I set up a repo to connect to it, so with the right configuration, we can have a build job generate with Jekyll or Hugo or something and automatically deploy. That's here: https://git.sr.ht/~_410bdf/sphynx-site I'll make a top level comment to aggregate people who want to work on that below! We can work out what static site generator we want to use together and then we can start getting it set up!
Also, 100% looking for ideas on things to test on my bug, if you're good at electronics debugging, throwing some test ideas at me would be greatly appreciated.
As always, stop by, hang out, say hi, ask questions, tell me what you've been up to, design review me, however you'd like to be involved is good by me! All the love and look out for my next post in a week or so!
Hi friends - still sick, feel like ass, but I did a lot of work recently, and if everything goes according to plan, within 2 more journal entries, I'll be able to report on my very first hair removal test!
This week was mostly board and circuit design. I just ordered two more circuit boards I designed, here they are:
Schematic:

PCB:

3D PCB:

I talked about this one in Journal Entry #1 - since then, I received the board and the parts for mk1, and it works 
Technically, this means I can test hair removal on myself, but I'm going to try and wait until I have the new board, for a lot of reasons. Here's what I changed:
My highly scientific outlook on this one is that there's a 75% chance it works as intended first shot.
This is the board I'm going to use to test hair removal on myself (if it works)! If it works, there aren't really any other current pump related changes to make and this one can get incorporated into the Sphynx Lite!
Schematic:

PCB:

3D PCB:

@macerated_baby_presidents@hexbear.net game me some really good feedback on this one in Journal Entry #2. I since figured out a better way to make the timer work by actually reading the manual for the part I'm using. This means the knob I'm using will actually be accurate and not have a dangerous failure mode! yay!
This one is a little less likely to be perfect on the first try - it is all new, unlike the current source, it's also a little more complicated, and because of that, I'm giving it 40% odds to work on the first try.
When I get these two boards, if they both work as designed, I will be able to plug in a benchtop power supply, rig up some kind of weird holder for an electrolysis needle, and go for a spot of hair on my thigh I've been growing out for this moment! Journal entry 4 will probably be me designing and ordering the battery submodule, so journal entry 5 will be my first report of actual hair removal!
We're on git! Specifically sourcehut! https://git.sr.ht/~_410bdf/sphynx
It's somewhat empty right now, it's also especially clunky because I just set it up and all of my commits are just dumping in all of my files, but now people can actually look at my files and mess with them for themselves, or even contribute if there's anything that anyone feels comfy adding!
As mentioned above, steady progess, waiting for boards to come in, making the battery board, and probably before the end of March I'll be starting to get rid of some body hair. End of April is a very reasonable timeline for a beta version of the Sphynx Lite to be available for enthusiastic individuals to order, build, try, and review! We're getting there!
Calls are out for a Sphynx logo for sure! Design review is always appreciated as well! Besides that, I'm just working through the early stuff, things are a little too turbulent at the moment for me to ask for much because things are moving too fast. Once I'm working on the Lite, it'd be SO sick if anyone artistically inclined would want to design some cool silkscreen for the Lite, maybe with a Blahaj, some trans/commie logos, possibly some original artwork - the possibilities are endless 
This one's a little terse because I'm sick and tired, but as usual, from last time - If you have any questions, please ask below! It doesn't matter if they're technical or non-technical, it doesn't matter if you think they're basic, dumb, not worth my time, or anything else - I want people to get excited about this and I would love to take the time to communicate the inner workings of this to y'all so that everyone can be included! I can't guarantee I'll reply to everyone but I'll do my best to reply to comments that are asking something directly or I have something to add to!
