26
45
27
52
submitted 3 months ago* (last edited 3 months ago) by bistdunarrisch@lemmy.world to c/astrophotography@lemmy.world

This was shot under extremely poor conditions with lot of clouds. So this is just a practice shot, but we try to get the best results with the equipment we have, so we will visit this target again with good seeing.

Equipment:

  • Fuji X-T5
  • Samyang 135mm
  • Star Adventurer 2i

Images:

  • 217x 60s
  • ISO 125

More info here: https://telescopius.com/pictures/view/185140/deep_sky/whirlpool-galaxy/M/51/galaxy/by-maxi_franzi

28
12

So I bought 2 sets because it looked like one set was briefly lost in the mail and this past week I got an email from Amazon that said one set I bought were "fakes."

  • Both sets have printing that matches legitimate manufactures.
  • The "legitimate" set have all black filters (not the metalized filters I am used to like Thousand Oaks Optical) the "fakes" have the metalized filters.
  • Both sets of glasses have the same transmittance as the Thousand Oaks filter material I use on my telescope and cameras.
  • The build quality of the "legitimate" glasses is quite a bit worse than the "fakes" with the two layers of paper being misaligned

So, what I suspect is that I actually received a crappy set of "real" glasses and a well made set of counterfeits, this seems in line with the press release made by the American Astronomical Scociety.^[0]^

Some of these newly identified counterfeits are indistinguishable from genuine Qiwei products and appear to be safe. Others look like Qiwei’s eclipse glasses, but when you put them on, you realize they are no darker than ordinary sunglasses. So, these products are not just counterfeit, but also fake –– they’re sold as eclipse glasses, but they are not safe for solar viewing.

So, did anyone get unlucky enough to get some 'real-fake' glasses? An did anyone get a set of legitimate glasses with the non-metalized filter?

^[0]^ https://aas.org/press/american-astronomical-society-warns-counterfeit-fake-eclipse-glasses

29
32
Messier 40 (live.staticflickr.com)
30
77
submitted 3 months ago* (last edited 3 months ago) by bdeclerc@lemmy.world to c/astrophotography@lemmy.world

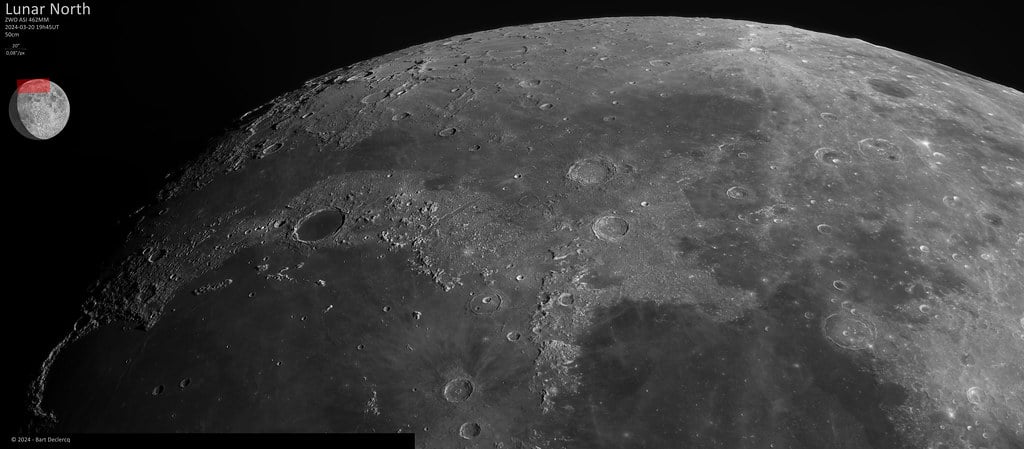
Last year, I had my mirrors tested optically because I was never 100% content with even my "sharpest" results - there was always a feeling that there was an unnecessary bit of blur in the raw data.

Happily, the 20" mirror itself turned out to be quite good (not perfect, but at Strehl 0.89 and lambda/10 it is completely within spec and not worth refiguring) - however, the secondary turned out to show a frankly ridiculous lambda/2 (!) astigmatism. Since it was also on the small side for use in deepsky imaging (4" mirror on a 20" F/4 scope) I opted to replace it with a 5" diagonal from Ostashowski optics. The terrible weather in Western Europe in the last 6 months prevented me from doing any real testing (or even reinstalling the telescope in the observatory...) until now.

However, the 19th & 20th of March were finally "good" - good seeing (by our local standards...) and on the 20th, transparent skies.

This allowed me to finally stretch the renewed scope's legs a bit, resulting (among a mass of other still to be processed data) in this 62 megapixel mosaic of the Lunar North pole at 0.08"/pixel

Check out the full resolution image on https://www.flickr.com/photos/bartcentral/53618375534/sizes/o/

31
50

This will be the only chance I will have to see a total eclipse so I slapped together all the gear I own and made a dry run today. There were some wispy clouds that made things a little soft but it's better than the 400mm I used in 2017.

32
38
M76 - The Little Dumbbell Nebula (live.staticflickr.com)
33
70
submitted 3 months ago* (last edited 3 months ago) by lefty7283@lemmy.world to c/astrophotography@lemmy.world

PLEASE do not look at the sun unless you are wearing proper eclipse glasses.

On Monday April 8th, 2024 there will be a total solar eclipse over the USA, Mexico, and Canada. If you are able to travel to the path of totality, I'd highly recommend it, as the next eclipse over the US won't be until 2045. The difference between a 99% partial eclipse and totality is literally night and day. Remember: it is only safe to look without solar filters during the totality period if you are in the narrow band where totality occurs.

These are good resources for finding out exactly when/how long totality will occur for your location, as well as recommended camera exposure settings:

http://xjubier.free.fr/en/site_pages/solar_eclipses/TSE_2024_GoogleMapFull.html

http://xjubier.free.fr/en/site_pages/SolarEclipseExposure.html

Here is some random assortment of advice:

  • Don't forget your solar filter. This goes on the FRONT of your lens/telescope before the light hits any of the optics. Do not look through a telescope or viewfinder with only eclipse glasses on your eyes. You will burn your retinas and damage your equipment.

  • Have backup location(s) in case your main observing spot is cloudy on the day of.

  • Use an intervolometer or control your camera via PC to automate your camera during totality. It's better to take in the eclipse with your own eyes instead of fiddling with camera settings. If something goes wrong at the last minute just leave it be and enjoy the eclipse.

  • Do a full practice run to test out all of you equipment before hand. Get used to taking your solar filter on and off quickly. Bring extra batteries, cables, SD cards, etc.

  • You're gonna be outside for a while on a (hopefully) sunny day. Bring plenty of water, suncreeen, and snacks.

  • Don't forget your solar filter. You want to focus your camera during the partial phases with the filter on, so that way you're ready to go as soon as totality starts.

  • Be prepared for eclipse traffic. During the 2017 eclipse I drove to my site in 3 hours the day before, and took 9 hours to drive back right after the eclipse. Top off on gas beforehand.

  • For those with widefield setups, comet 12P will be fairly close to the eclipse and about mag +4.7. Several planets will be visible too.

  • It's okay if you aren't exactly on the centerline in the path of totality. Even going 2 miles into the zone of totality will get you a whole minute of total eclipse time, and going halfway to the centerline will get you over 3 minutes.

  • At this point it's probably too late to book a flight or hotel that isn't stupidly expensive. Personally, I'm gonna sleep in a walmart parking lot the night before the eclipse.

  • DON'T forget your solar filter.

Please keep our community rules in mind when sharing your eclipse pics (titles, acquisition/processing info, etc). I can't wait to see what everyone is going to capture in just a few more weeks!

34
34
submitted 4 months ago* (last edited 4 months ago) by bistdunarrisch@lemmy.world to c/astrophotography@lemmy.world

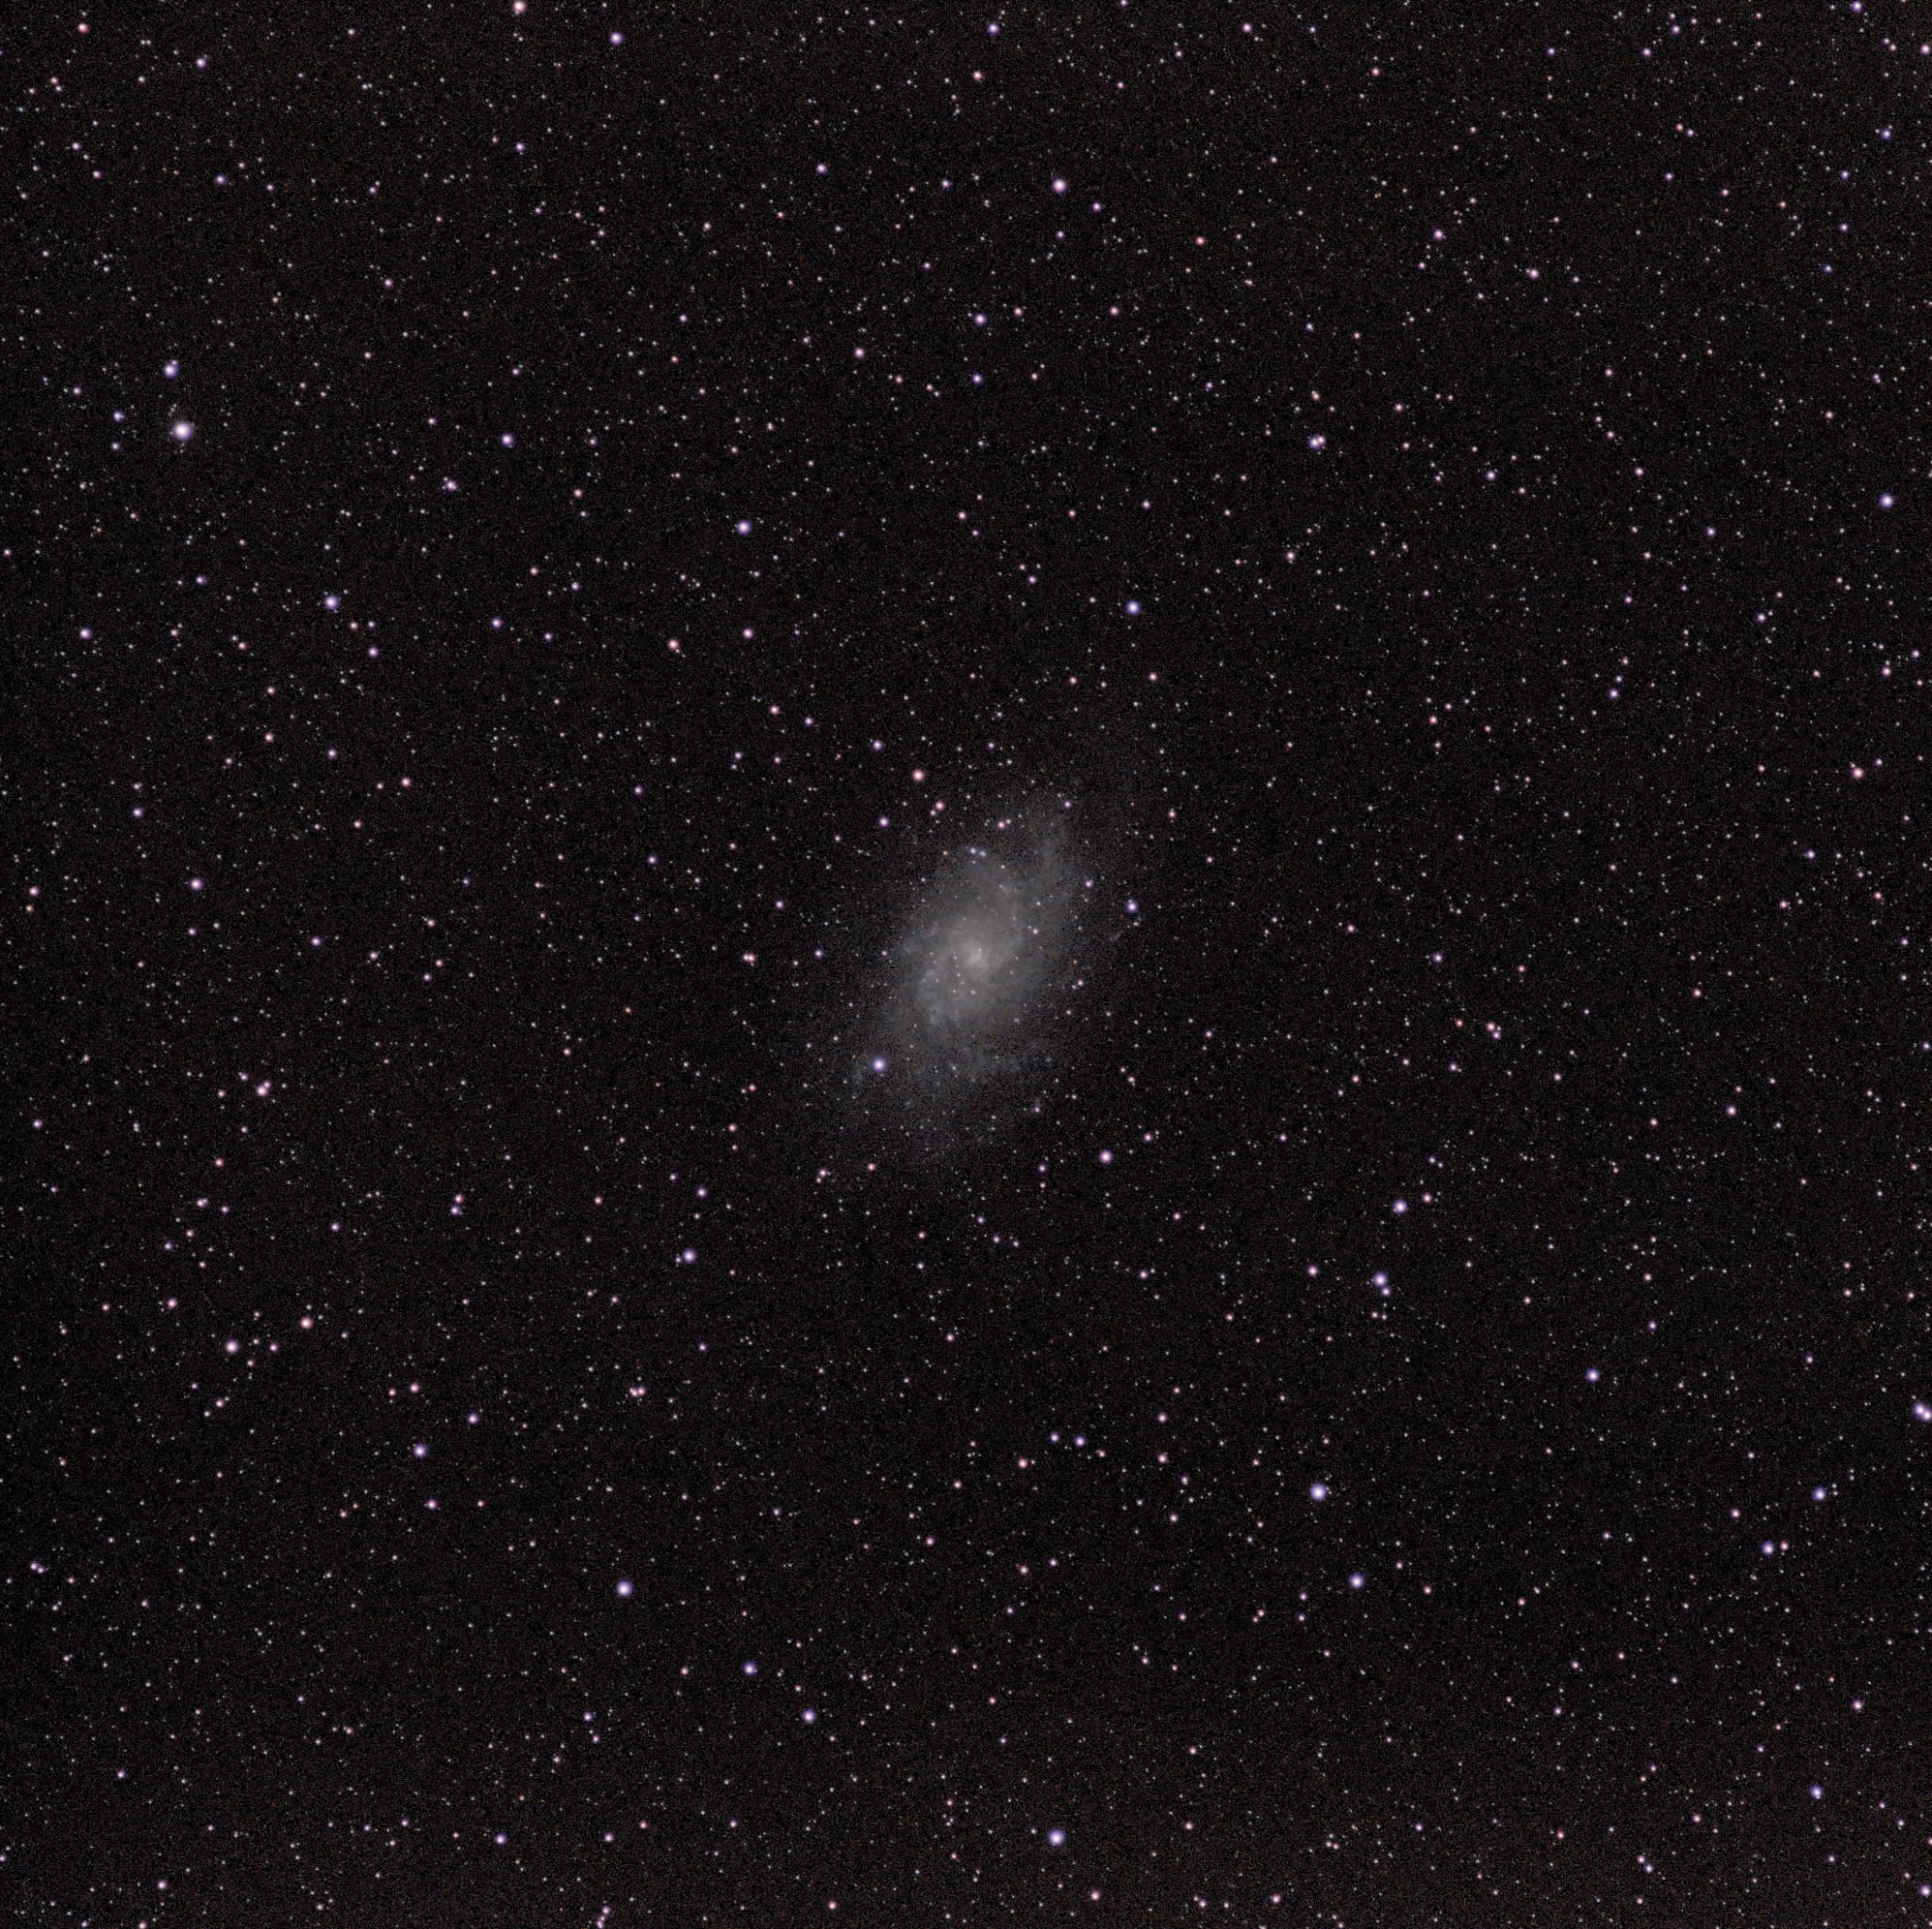
This is just a test shot to see how much detail can be captured using the 135mm Samyang lens. I think with way more exposure time and proper polar alignment the details can be further improved.

  • Fuji X-T5
  • Samyang 135mm f2.0
  • 400x 15s

Obviously with a real telescope the result would be way better, but as a beginner I first try to push my equipment I already own.

35
20

This was a very challenging target for us as we are still beginners, but the comet stands out nicely. We hoped for a bit more detail, but shooting with the Samyang 135mm lens is quite a strech for this target.

Equipment:

  • Samyang 135mm f2.0
  • Fuji X-T5
  • Star Adventurer 2i

Images:

  • 400x 15s
  • ISO 400

More infos here: https://telescopius.com/pictures/view/183073/comet/by-maxi_franzi

36
85
Sun (lemmy.world)
submitted 4 months ago* (last edited 4 months ago) by the0josh@lemmy.world to c/astrophotography@lemmy.world

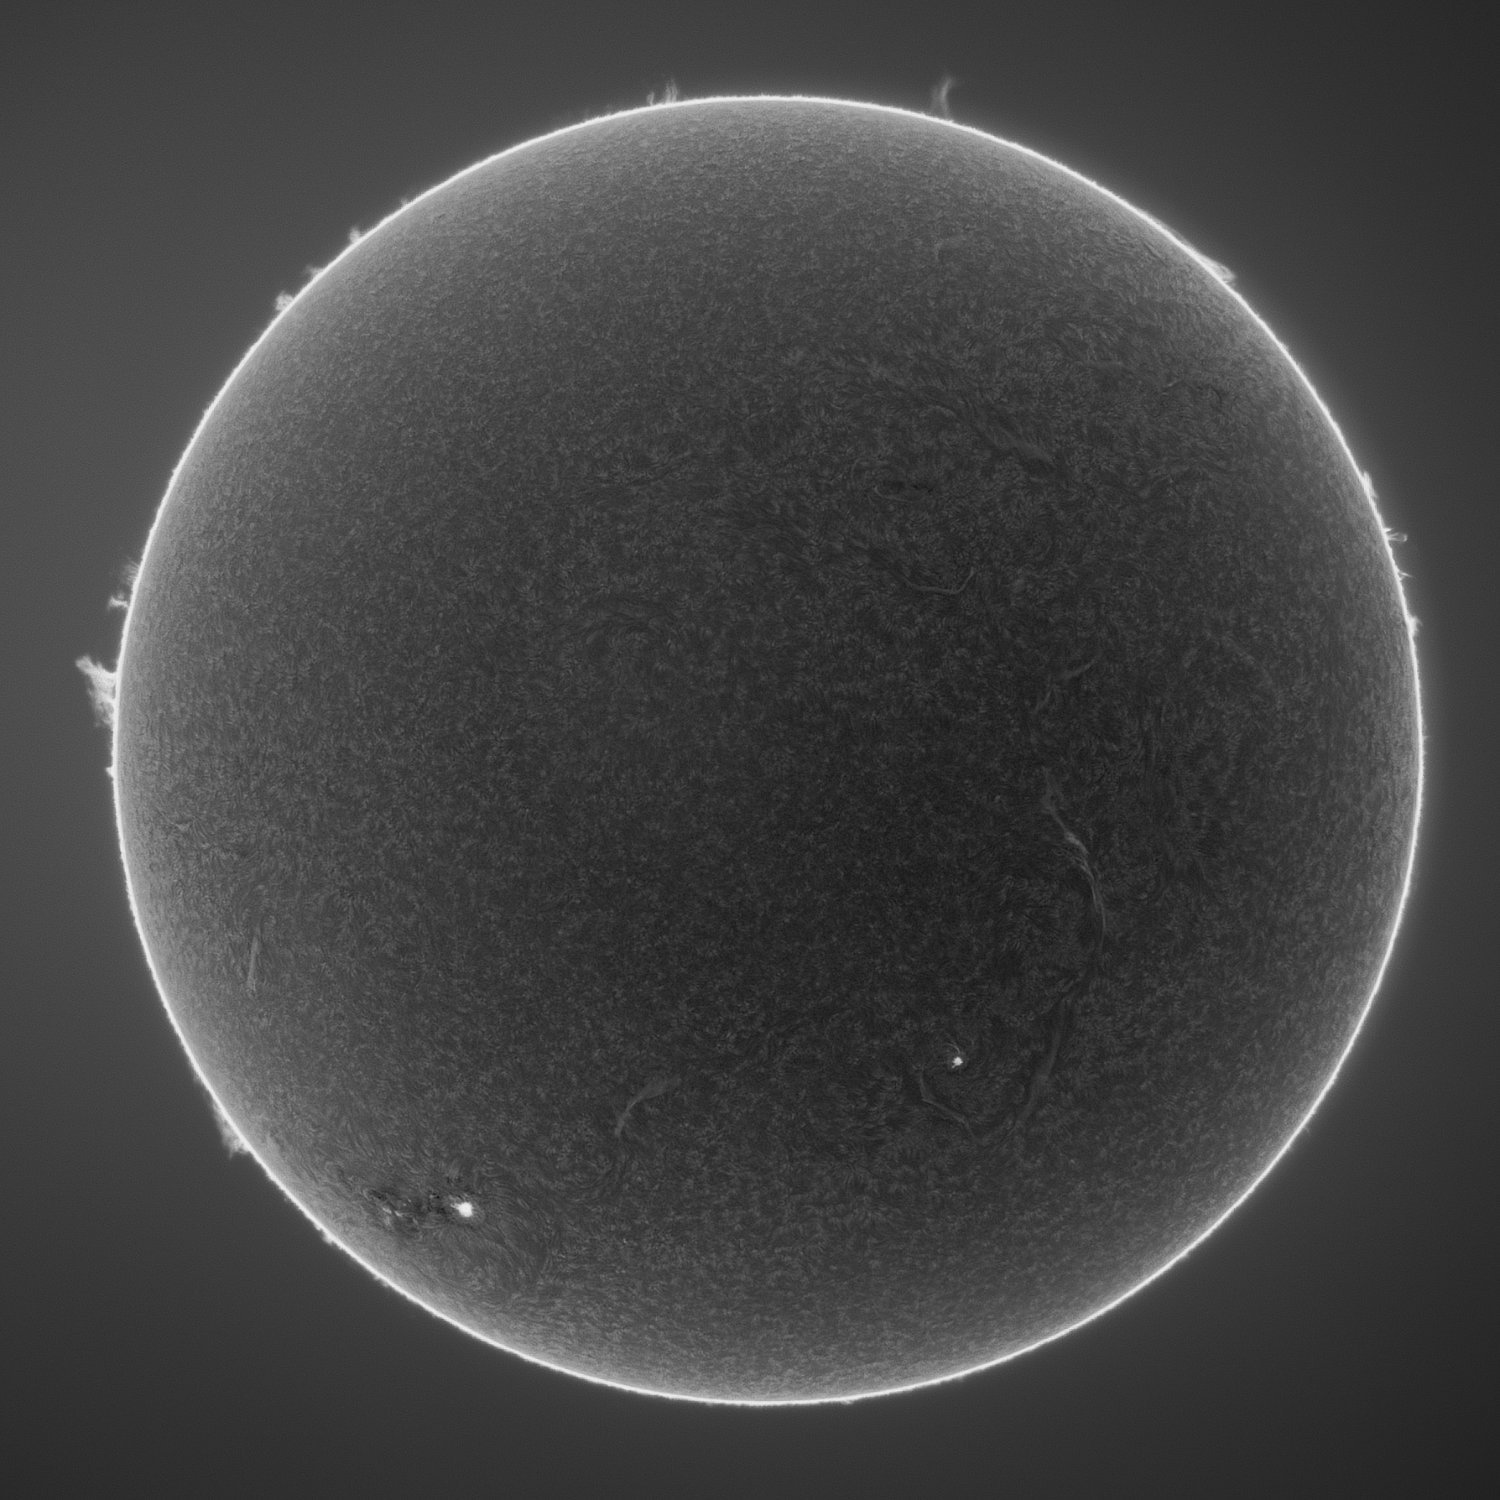
Day 2 of owning a new (to Me) Lunt60 in preparation for the April 8 eclipse, first time posting here.

Lunt60 Single Stack+ ZWO 1600 Pro at 10C + Atlas EQ-G.

Acquisition in Sharpcap. 0 gain, 2.7ms exposure

PIPP: Cropping and centering

AS!3: selection of best 10% of 500 frames

ImPPG: deconvolution, sharpening, tone curve (inverted surface and stretched prominences)

Seeing, focusing, and pressure tuning were all suboptimal, but I'm still happy to have taken some data through the full process.

Comments and suggestions welcome.

37
18
submitted 4 months ago* (last edited 4 months ago) by Guenther_Amanita@feddit.de to c/astrophotography@lemmy.world

Hey all!
I just made following post: My current learning experience as a noob in astrophotography, with very shitty/ minimal equipment (includes pictures too!)

I'm a total beginner, and even my currently best work looks really sad compared to the stunning pictures you share here as real and experienced pros. I have to say, the further I progressed in my journey in the last months, the more I began to appreciate your work. Great job on that! <3

I wanted to encurage you all to make a similar post or comment in this thread and share your past about this special and lovely kind of photography.

I think nobody here has started with equipment more expensive than my annual income and more knowledge about the night sky than any astrologist (Edit: astronomer, I don't think anyone here believes in horoscopes :D) here on earth.
What were your first results, with what equipment? What did you learn over time, and what stuff or trick has improved your results the most?

I'm particularly interested in the stage of you back then, where I am currently am - of just owning a damn (simple + universal) camera and learning the basic stuff.
One of the reasons for that is I want to see what "best result" I can get with this stuff, and what my limits could be.

38
32

Hey! I wanted to share my "experience" as a newcomer, starting not only with astrophotography, but also with photography in general recently.
Just a few months ago, I didn't even know what an aperture, stacking or other basic stuff is, and now, I feel a bit proud and think I'm getting there.

I know, it really is not much, but I'm trying to not compare myself with other photographers here who have 30 years of experience and equipment worth more than my yearly income.
I just wanted to share my learning experience with you all, aswell as all issues and stepping stones I've had and (hopefully) grown out of.

As a camera, I use a Sony RX100 III compact camera, which is probably the least thing any of us here think about when talking about astrophotography.

Don't take this post too seriously :) It's only a small anecdote and hopefully a bit entertaining for you all 😊


Btw, I also tried to include a few pictures (stacked + edited, aswell as one light frame to compare) in each paragraph for visualization. They're "hidden" behind a spoiler-tag for better readability.

First pictures

They were literally just taken as-is out of the window of my apartment, without any mount, and with 30s shutter speed. No stacking or whatever.

Pics

First stacking tests

Without DBF, usually shitty.

Pics

Using DBFs + better camera settings

In the beginning, I only used the -withoutDBF script.
I started using the display of my E-reader (white, diffuse light) to capture my flats, reduced the shutter speed from ~20-30s to 10s (no more trails) and increased the aperture by one F-stop (2 or 2.2 instead of 1.8, the lowest), which resulted in sharper images with less noise.
Also, I got a cheap camera mount :D

ComparisonWithout DBF: Same picture, with DBF added later:

Better software skills

I began to learn better how Siril works and developed my workflow. It's fascinating how much I was able to "rescue".

Learning curveEdit, just two months prior: Exact same photo/ .fit-file, opened today and edited with my current skills:

Better spot and conditions - Today

Many of the pictures were taken in or near a city, and now, I only have to go a few minutes by foot to get my perfect spot with barely any light pollution.

I also learned to hate our fucking moon - as soon as I notice that we have more than crescent moon, I don't even leave my house, except if I want to make a few pics of the landscape.

Final pics

Additional ones, just because I can

They're single takes or star trails, but still taken at night.
I found them neat too, so I just included them :D

Pics

Future path

I really don't know what this will lead to.

  • First, I definitely want to learn my stacking software better, because I think I didn't unreavel all of its' potential yet.
  • Also, I want to get a better camera some time, when I have the money for it
  • Fight some more issues, namely those from my last post here (lens condensation + tracker)
  • and probably much more!

Thank you for reading! :)

39
10

For the pros here, who have equipment worth tens of thousands of moneys, this may sound like a troll post, but trust me, it isn't :D

As a beginner, I had a lot of fun photographing the night sky and learning all the post-processing the results of my work for the last months.

A lot of my work went straight to the trash, either because of a bad moon phase, light pollution, condensation, or super stupid mistakes, like forgetting to tick a checkmark in my time lapse mode and then coming home after 2 hours of freezing cold temperatures and seeing that your shutter speed has been 0.2 seconds all along... 😵‍💫 I still learnt a lot from my mistakes and improved rapidly. It was a lot of trial by error, but rewarding.


One thing I still fight with is said condensation.
I'm both broke ^(or, even if I had the money, I still wouldn't buy a heating mantle for 250€ just for my amateur photos tbh)^ , and my camera is probably a joke compared to yours.

My workaround has been to use small hand warmers.

(If you don't know what I mean)(the ones you have to boil first, then click the metal clip, and then they "freeze", becoming warm for 30 minutes)

I activate and then press them against the front of the lens for one minute each 5 minutes or so, which of course sometimes results in

  • camera shake,
  • missing photos,
  • and in the worst case, smears on the photo, which won't even be recoverable with my flats.

The reason for doing that is that I have a Sony RX100 III compact camera, which has a super small lens, so no heating mantle can fit on that.

A friend of mine is already more advanced than me and owns one, but his heating mantle is like 20 cm wide, while my lens is 5 cm max when fully drawn out :D

Do you have any cheap alternatives or DIY solutions for my problem?


Also, does anyone have an idea or suggestion on what I can use as star tracker

(?)(the mount-thing that moves my camera with the rotation of the earth)
when I don't want to spend $$$ on a professional one?

I don't need a super expensive or accurate one, just one that allows me to increase the width of my photo, so I don't have to crop >1/3 of it in the end.
I don't need it to keep my shutter speed at 1 minute+, just to keep it below 15s, like I currently do.

Are there any workarounds, like using an Arduino or so?

Right now, I'm a bit restricted to about ~30 photos @ 10s, because elseway, the crop zone is too small or there are small trails forming.

40
13

I had to warm up my lens from time to time to prevent condensation build up, and therefore, every 5th image or so is missing.
Is there a way to artificially fill the gaps in the trails?

41
28
Lunar Halo (mander.xyz)

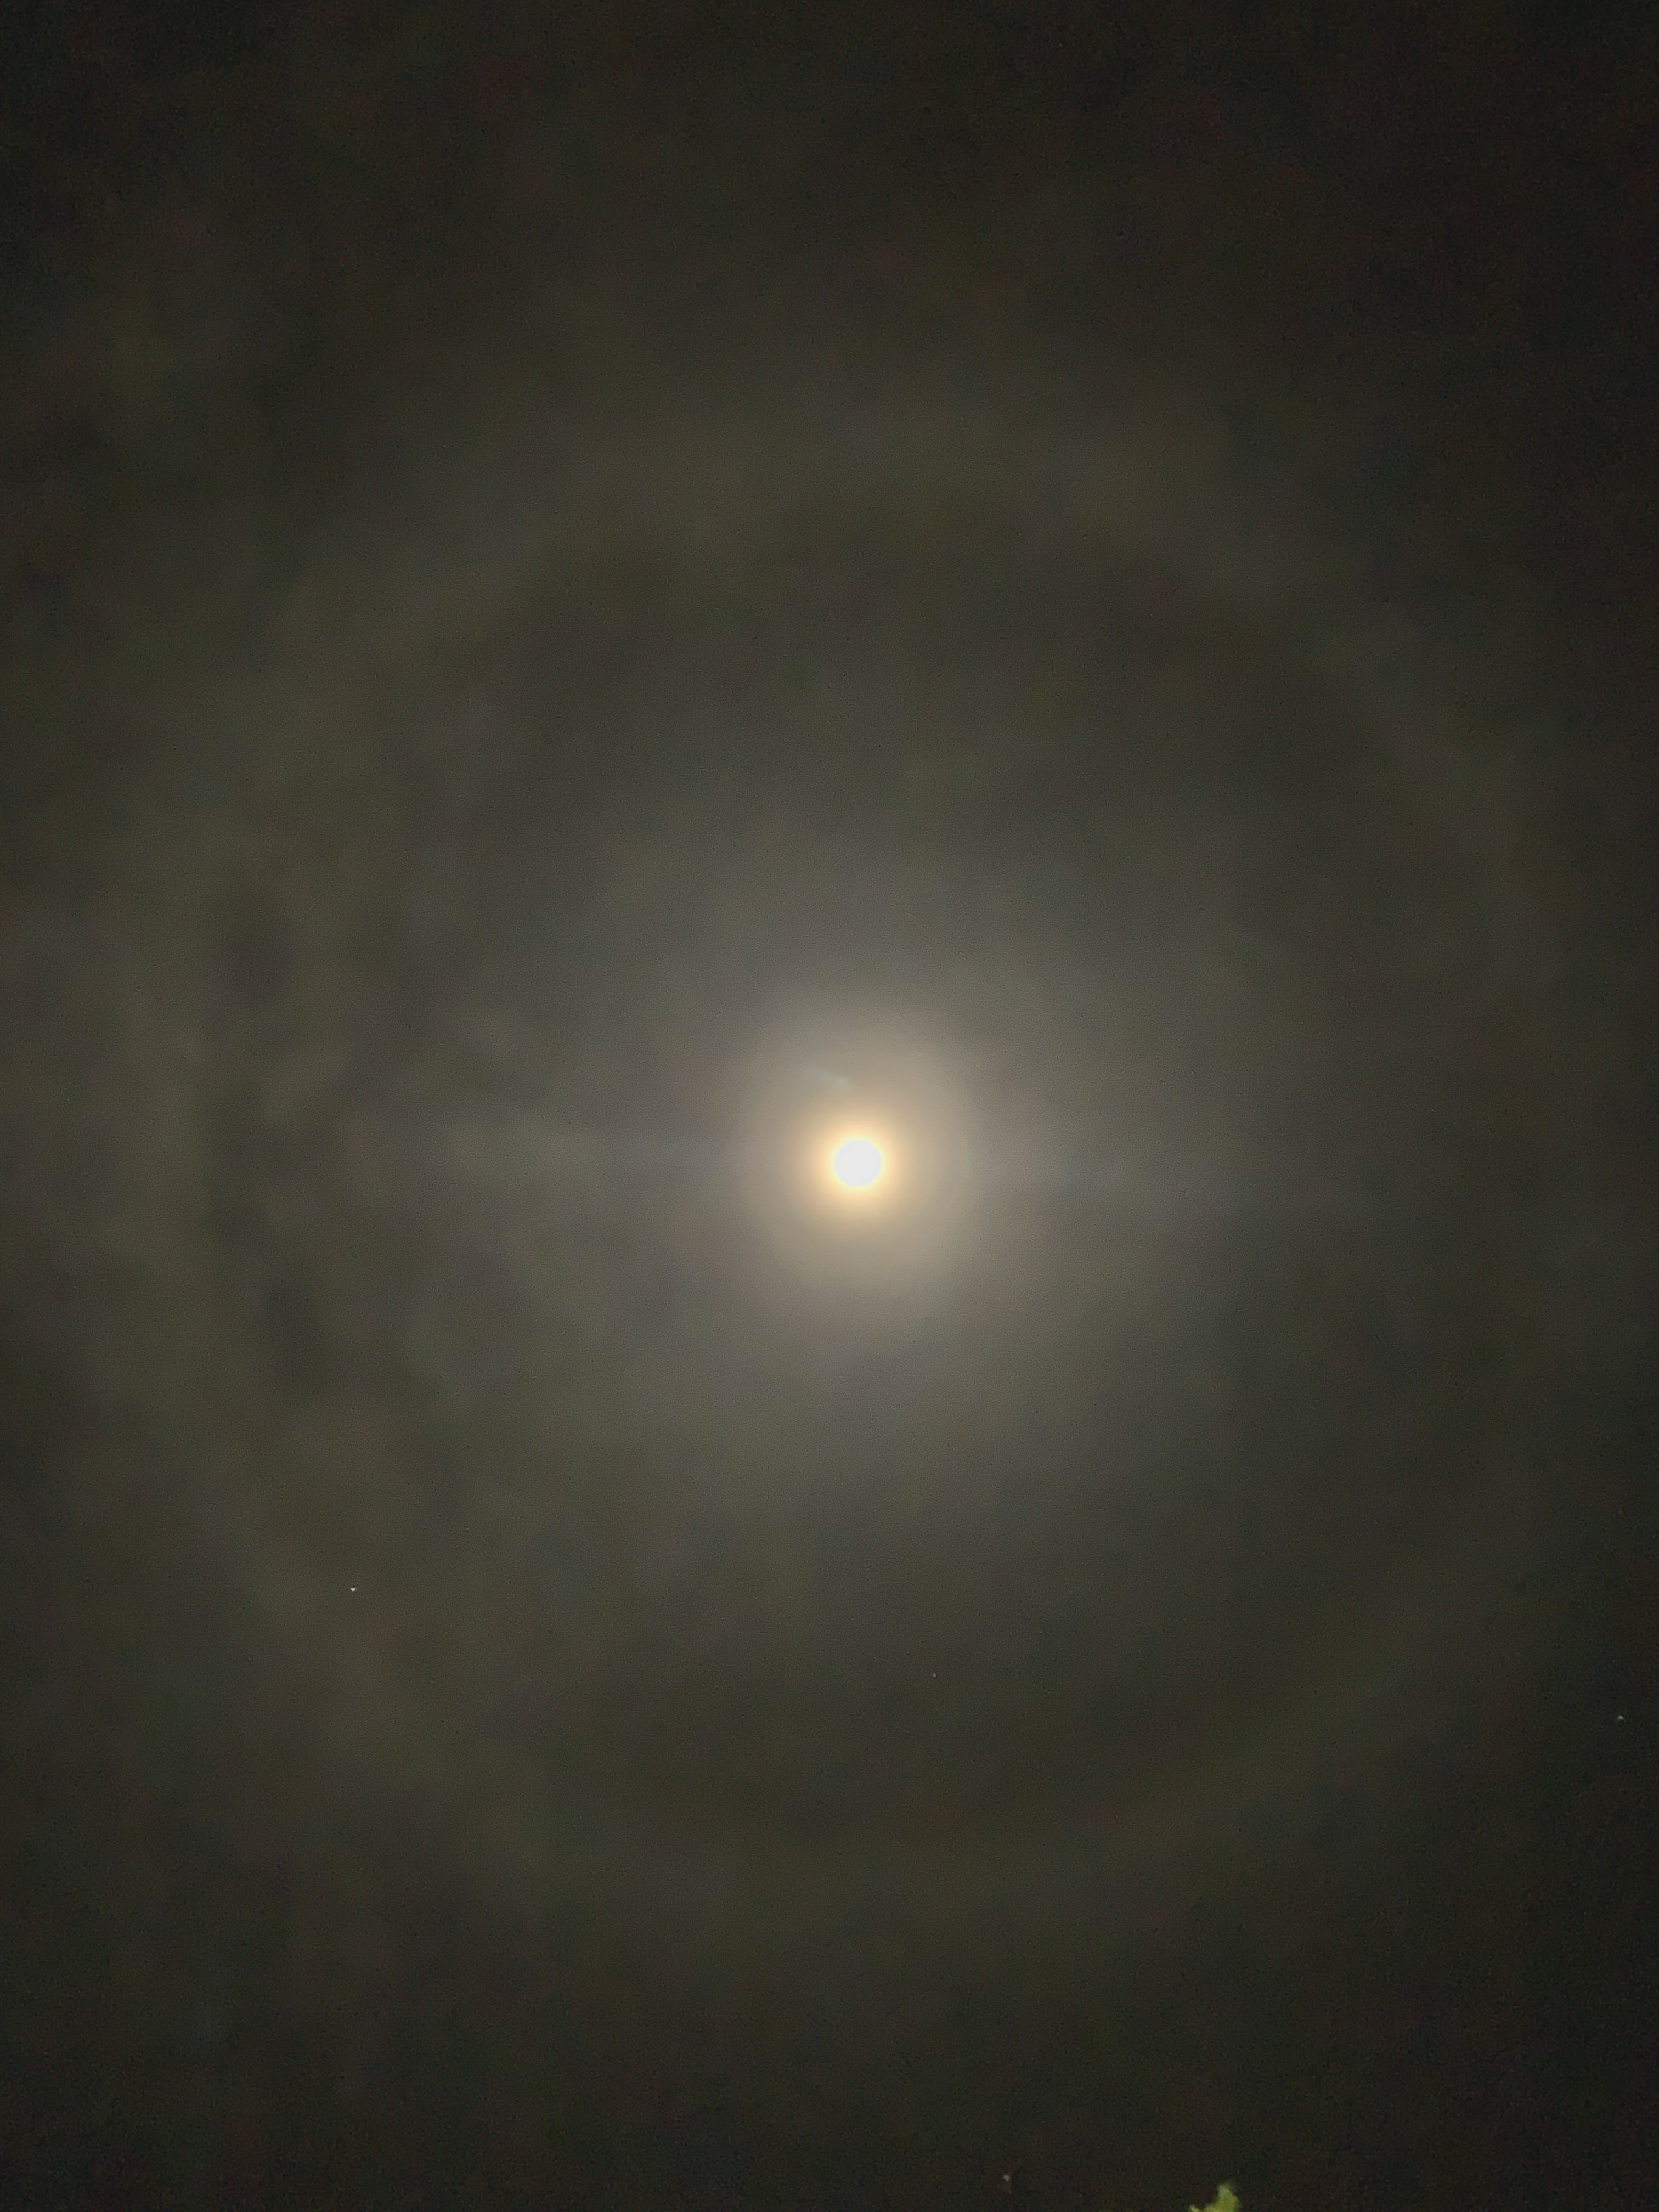
It is a bad quality photo taken from a mobile. The circle that surrounds the moon is formed by the refraction of the moonlight when passing through ice crystals present in the atmosphere. At times surrounding the moon itself you can see a circular rainbow (they all are, but we see only half of the solar rainbow). This phenomenon is called a lunar halo.

42
51
The Bubble Nebula in SHO (live.staticflickr.com)
43
31
DWB 111 - The Propeller Nebula (live.staticflickr.com)
44
29

Quite a big improvement over the last image of Orion I posted, and the two other attempts in between that I didn't post. This is mainly due to the addition of an OG star tracker that has allowed me to take 30" sub exposures and helped me to increase my total integration time. So this was:

  • 407 * 30" exposures
  • 50 dark frames
  • 50 flat frames
  • 50 bias frames

shot with:

  • Sony A7Cii
  • Minolta 75-300mm f/4.5-5.6 @ 300mm f/5.6
  • OG star tracker

and my processing steps were:

  • calibration, registration and stacking in Siril v1.2.0
  • background extraction, stretching, colour calibration, and noise removal again in Siril
  • final levels adjustment and crop in darktable.
45
10

Tonight, if the clouds allow me, I wanted to take pictures with my Skywatcher Star Adventurer mini. As I'm going to set up a small telescope (a Celestron C90) I need a very good alignment to the Polar so that I don't have any traces left. Tips to make an alignment as accurate as possible? Thank you

46
37

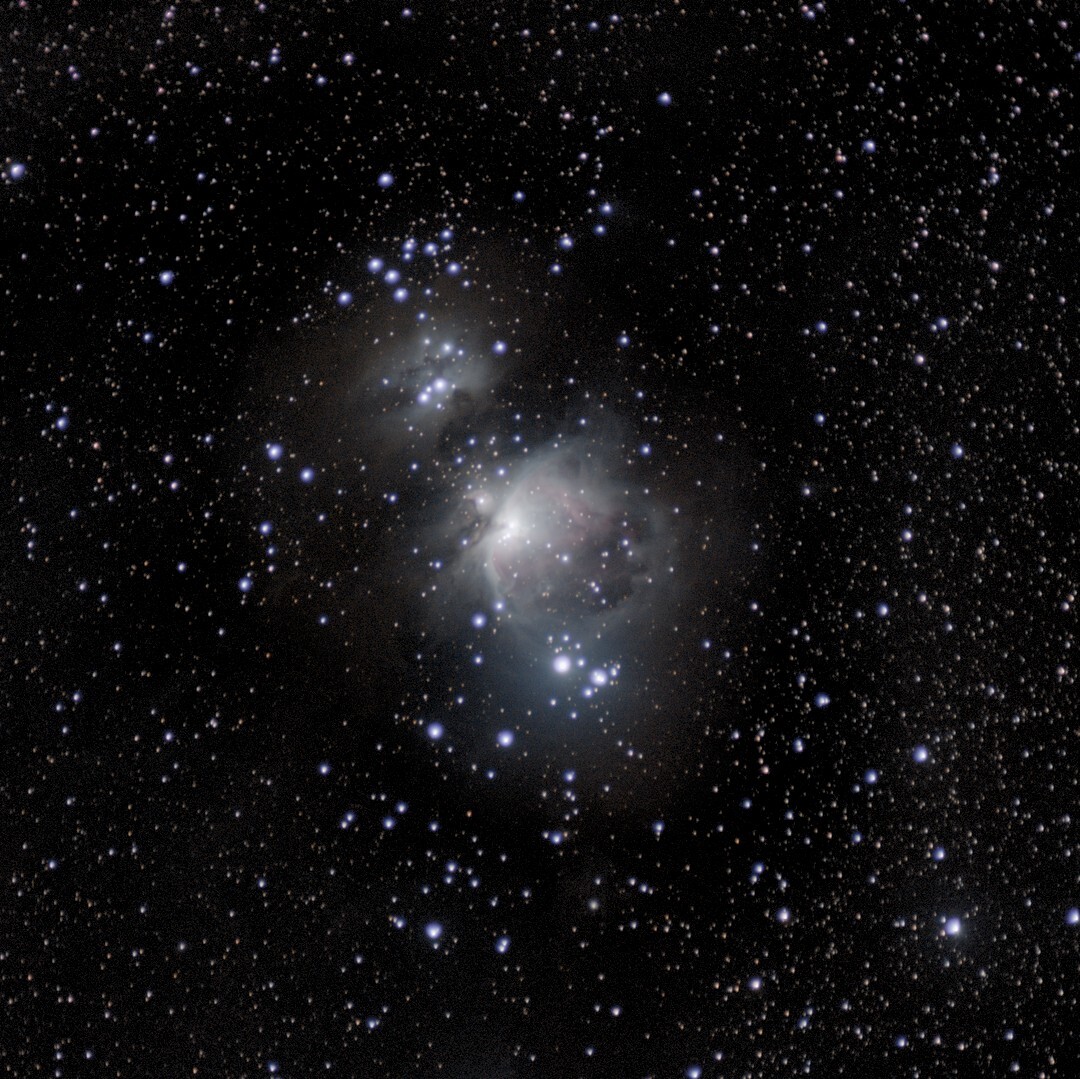
This is 1158 * 0.8" exposures along with 50 dark and 50 flat frames stacked with Siril. Shot with my Sony A7Cii and a Hasselblad 350mm f/5.6.

47
38
submitted 5 months ago* (last edited 5 months ago) by xurxia@mander.xyz to c/astrophotography@lemmy.world

My first photo with a telescope. It is not a incredible shoot but I am very proud of it.

Telescope: Celestron C90 Camera: Sony A7R Mk II (APS-C crop mode) Exposition: 1/10"

48
24
49
28

My first try at IC 1805 with my stock Fuji XT camera. Turned out way nicer than I could’ve imagined.

equipment:

  • Samyang 135mm f2.0
  • Fuji X-T5 (unmodified)
  • STC duo-narrowband clip-in filter
  • Star adventurer 2i

frames:

  • 550x 60s
  • ISO 1600
  • f2.8

editing:

  • stacked in Siril
  • background removal with GraXpert
  • editing in Photoshop

More infos on Telescopius: https://telescopius.com/pictures/view/178053/deep_sky/heart-nebula/IC/1805/diffuse-nebula/by-maxi_franzi

If anyone knows what causes the elongated star shape in the top left corner please let me know. I tried to get the focus as perfect as possible.

50
7

I love seeing the astro images posted here, but may I share an algorithm for making them even more beautiful?

Most astro images are created from separate red, green and blue images taken with electronic detectors (whether using classic BVR filters in an attempt to replicate what the eye might see, or some other combination in a "false color" image). There are two big problems that are common with the images created in this way (even by professionals).

The first is in the choice of stretch: how brightness on the detector maps to brightness on the displayed image. Most choose a linear or a logarithmic stretch. A linear stretch brings out fine detail at the faint end, but can leave the viewer ignorant of details at the bright end. A logarithmic stretch allows you to bring out details at the bright end, but not the faint end. Instead of these, choose an asinh (inverse hyperbolic sine) stretch, which is able to bring out both the faint and bright features. It scales linearly at the faint end and logorithmically at the bright end, giving you the best of both worlds.

The second is in the handling of saturation: how to display pixels that are too bright for the chosen stretch. Most apply the stretch separately in the red, green and blue channels. This makes the cores of bright objects appear as white in the color image, while they are surrounded by a halo that is more appropriate to the actual color of the object. The color of a pixel should instead be set by considering all of the channels together. This way, bright objects will have a uniform color, regardless of whether the stretch has been saturated in any of the channels.

See here for a direct comparison between the classic approach and this (not really) new algorithm on the old Hubble Deep Field.

If you would like to adopt this algorithm for your own work, there is a python implementation that you might find useful.

view more: ‹ prev next ›

Astrophotography

1520 readers
3 users here now

Welcome to !astrophotography!

We are Lemmy's dedicated astrophotography community!

If you want to see or post pictures of space taken by amateurs using amateur level equipment, this is the place for you!

If you want to learn more about taking astro photos, check out our wiki or our discord!

Please read the rules before you post! It is your responsibility to be aware of current rules. Failure to be aware of current rules may result in your post being removed without warning at moderator discretion.

Rules


If your post is removed, try reposting with a different title. Don't hesitate to message the mods if you still have questions!


founded 1 year ago
MODERATORS