PC Master Race

18313 readers
184 users here now

A community for PC Master Race.

Rules:

  1. No bigotry: Including racism, sexism, homophobia, transphobia, or xenophobia. Code of Conduct.
  2. Be respectful. Everyone should feel welcome here.
  3. No NSFW content.
  4. No Ads / Spamming.
  5. Be thoughtful and helpful: even with ‘stupid’ questions. The world won’t be made better or worse by snarky comments schooling naive newcomers on Lemmy.

Notes:

founded 2 years ago
MODERATORS
1


Gamer's Nexus made a 3.5 hour investigative report video on GPU Export Controls and the GPU Black Market. Here is a related article on their web site that links to the video, now showing it being copyright claimed by Bloomberg L.P..

Here is an alternative link to the video on Rumble and somebody put it on the Internet Archive as well.

2


I built a PC for my friend and I am at my wit's end in trying to figure out why the wifi isn't working well on his PC. MB: Z87-G45 GAMING OS: windows 11 RAM: don't recall brand, but I think it has 16gb Old Wifi Adaptor: FV-AC2030T (I don't have the part information for the new wifi adaptor that we bought within the last month) GPU: ASRock AMD Radeon RX 6600 Challenger

Issues: High ping, average was about 80-100 ( not bad ) but it would have spikes of high ping(200+), and there would be anywhere from 5 to 10% packet loss. Info was from using the ping command to reach out to google. Packet loss was also seen when pinging the router directly.

Things I have tried:

  • Checking whether it was just the strength of the wifi being an issue. I brought over my own PC and confirmed that my PC's wifi was better than his.
  • Updating the motherboard BIOS and drivers (link to their website) The BIOS was an older version originally (don't recall which one) but I've updated it to 1.9. I updated the drivers to 10.1.1.45 for Windows 10 64. Potentially this is a problem since windows 11 is what is installed.
  • ensuring the drivers for the old wifi adaptor were up to date. Did the same for the new one.
  • Switching out the wifi adaptor in case the old one was faulty. The one listed above is the old on, I don't have info on hand for the new one.
  • Checked a couple of different RAM module in case 1 was faulty. I think i test all 4 ram modules, alone connected the the primary RAM slot and the wifi was not affected.

As of now, the options I'm seeing are to get a new board, ram and cpu, or installing windows 10 (since the board doens't come with TPM and may be the cause)

Linux sadly isn't an option due to the games my cousin plays not all functioning on Linux.

Any suggestions at all would be appreciated.

3


I noticed my D: drive was marked as dirty and some folders were coming up as corrupted, so I recovered as much data as possible, and then scheduled a chkdsk /r /f on next restart, and I've been here since Thursday (it progressed a bit throughout Wednesday):

I now need to urgently access files on my C: drive, but don't know if I should interrupt this process with a forced power off.

4


I wonder what went on in the AMD employee's mind when they packed this.

I can understand putting a 9800X3D in a tray and that in an envelope with bubble wrap.

But after that they put it, not inside one cardboard box, but two and both boxes are hugely oversized for their contents.

The final box size is almost hilarious to house a single 9800X3D.

The original video is here.

5


The USB onboard controller on my ASUS Crosshair VI seems to have busted on me. That being said, it would seem I’m now in the market for a new MB.

I haven’t been keeping up with the industry and my MB crash is a bit unexpected, so I’m coming into this a bit blind. Looking for advice or feedback from your own experiences.

I have the following components:

  • 2 x 16 gb 288 pin 3600 DDR4 SDRAM G.Skill Trident Z Neo
  • EVGA FTW3 RTX 3080Ti
  • AMD Ryzen 7 3700X 8-core/16thread
  • Seasonic - PRIME TX-1000 80+ Titanium PSU

Looking for suggestions. Not sure if it’d be better to get a new CPU and MB or continue with the current setup with a new MB. I’m also vibing with MBs that have very little to no RGB, I’m a bit RBG’d out.

Appreciate any help or advice

(Edit: added PSU)

6


i managed to build my first proper pc in the most hacky way, and it works wonderfully(the one of the previous post).

the only problem i have left now is that during the heavyest workload i need it to run; the card reaches 77°C and i'm not sure if it's dangerous for the card to be cycled between 77°C and 51°C while it writes to the hdd. due to thermal stress.

the problem isn't the air flow of the case, but the fact that the pc is placed in an under desk shelf, the heat is pushed backwards and outwards by the gpu and psu fans, but the hot air still rises toward the top, where the card intakes air.

i'm already seeing if i can put fans in the cubby under the desk, but i'm also seeing if i can undervolt the gpu to have it heat less, since from what i could understand the performance loss is minimal up to a certain point.

the problem with that is that nvidia doesn't expose the core voltage in the drivers for linux (... torvalds was right in this front). i found that there is a workaround to do that with LACT but i'm afraid it's going to mess the card's warranty or the card itself. what do you think?

7


after finally having some free time between exams and work, and enough money to build it. i decided to assemble a decent pc, both for interference and general usage. due to limited budget i chose to pick up a refurbished thinkcenter m700 and a 12GB 3060. the problem? the thinkcenter is an sff pc. so it would have never fit the card, plus due to using a proprietary psu i couldn't upgrade it to something that could run the card.

so that's when the quest began to see how i could ever shoehorn a card+ psu in this mess.

the first thing that arrived was the thinkcentre, so i got to work trying to find a way to make both the pc's and the gpu's psus on at the same time. so i needed some power that would turn on as soon as the pc turned on to power a relay, and thus, turn on the gpu psu.

Luckily the pc had two SATA connectors for powers, one of which i opted to put an ssd in, so the 12V line was free. it was a bit annoying since it used a CPU molex, but the box of scrap parts took care of that:

i ended up adding the relay on the 12V line to turn on the other supply

and the original connector that was in the pc on the 5V to power the ssd.

then it came time to fit the harness inside of the pc, i managed to snake it in... even if i had to mess with zip ties since i had spliced the ssd wire the wrong way around. but in the end, the pc side came out pretty well:

fast forward a couple of weeks (courtesy of the postal system shipping my package to the other side of the country by mistake), i got the card, the psu and the riser.

since i wasn't able to find a riser that turned 90° to the right, i had to place the gpu above the psu, and make a bracket to hold it up, since the riser cable was as stiff as rock. plus i had the idea that after it was all buttoned up, the psu fan would pull air through the gpu as well, somewhat aiding it.

after mocking it up with books, it didn't look too bad so i went on with it.

so now i had to make the bracket, the holes in the top cover to allow both the riser and the switched line out of the case, and find out how to hold and protect this whole mess... so to the workshop i work at we go.

luckily they allowed me in on sundays so i could use all the tools we had in there. (the joys of working as a small artisan :-D)

i have to admit, having a card worth so mutch in the midst of alluminium shaving felt wrong in a way i can't explain, in a laptop next to a pool way.

first thing first, the holes in the case, i just roughly marked where they where supposed to go, and i added the leeway to allow the panel to slide open. the riser hole was done with an angle grinder, while the switched line hole was done with a christmas tree drill bit to 12mm:

now i had to find something that could cover up the sharp ends of the cut, both to not destroy the riser cable and my fingers. luckily we had just bought new band saw blades, and the blade protectors fit perfectly for this job:

now to the psu and bracket for the gpu: my idea was to add two plates to anchor the gpu to the psu, using the card's pci mount to bolt it on. and then add some brackets to allow the psu to screw where the case screws went, locking it all in place:

it's ugly as sin, but in the end it was going to be covered up, so it didn't matter.

the card was locked in place with a nut and bolt in the hole where the screw to secure the card would go, and a bolt/washer/wing nut set to hold the other side, in between the two slot "teeth" the card has.

now i just needed something to hold up the back of the card, since holding it just from the faceplate felt like an extremely dumb idea.

an L extrusion with some of the blade protector on top did the job, i was even able to use the psu's fan screws to lock it in place:

now it was mechanically sturdy, it just lacked a shell to cover it up, in between the scraps i found a sheet of something that would work. i only know it from brand name, but it's essentially a foam panel sandwitched between two alluminium plates, if you cut only one panel, you can bend it and it looks pretty good. so i went with it.

i added L brackets on the pc panel with rivets to hold it steady, and made some holes in the panel to let the card exaust both out of the front and back.

(frankly if it wasn't for the psu cables i would have made it out of plexiglass, since seeing the card suspended like this is beautiful)

now it was just time to bring it out of the workshop and button it all up:

and that's it. i'm surprised it took around a week to build it all, excluding the exodus the gpu had to take to arrive to me.

the only problem i have left now is that during the heavyest workload i need it to run; the card reaches 77°C and i'm not sure if it's dangerous for the card to be cycled between 77°C and 51°C while it writes to the hdd. due to thermal stress.

the problem isn't the air flow of the case, but the fact that the pc is placed in an under desk shelf, the heat is pushed backwards and outwards by the gpu and psu fans, but the hot air still rises toward the top, where the card intakes air.

i'm already seeing if i can put fans in the cubby under the desk, but i'm also seeing if i can undervolt the gpu to have it heat less, since from what i could understand the performance loss is minimal up to a certain point.

the problem with that is that nvidia doesn't expose the core voltage in the drivers for linux (... torvalds was right in this front). i found that there is a workaround to do that with LACT but i'm afraid it's going to mess the card's warranty or the card itself. what do you think? (i'm going to post the question aside as well so people don't have to go through a bible worth of build montage)

i want to thank all the peeps in the !localllama@sh.itjust.works and !pcmasterrace@lemmy.world communities for helping me understand the technicalities of this whole mess, since i never had hardware this poweful at hand.

especially @Smokeydope@lemmy.world and @brucethemoose@lemmy.world from the locallama community for helping me figure out if it was even worthwhile to do this, and for giving me clues for setting up an enviroment to run it all.

and @fuckwit_mcbumcrumble@lemmy.dbzer0.com from the pcmasterrace community for helping me figure out air flow issues.

8


cross-posted from: https://lemmy.wtf/post/25869807

cross-posted from: https://lemmy.wtf/post/25869804

cross-posted from: https://peertube.wtf/videos/watch/8749fe8f-5ec1-4ca6-93b5-cc10720a2167

Wage all-out war with infantry and vehicle combat, class-based squad play, and cutting-edge audiovisual immersion. Where Fighter Jets, Tanks, skydiving RPGS, Heavy Artillery, and high-intensity infantry combat become one. > > > > > > Demolish your surroundings for a strategic advantage with Tactical Destruction. Turn your vehicle into a wrecking ball, bury a squad under a ceiling, or create new paths to victory. > > > > > > Battlefield’s new Kinesthetic Combat System makes you more connected to your soldier and environment than ever before. With overhauled gunplay and tactical movement, from crouch sprint to drag and revive, every shot and movement is more instinctual and precise. > > > > > > > > > Learn More: http://x.ea.com/84824 > > > > > > Pre-Order Battlefield 6: http://x.ea.com/84823 > > > > > > > > > Stay updated on: > > > https://x.com/Battlefield > > > https://www.instagram.com/battlefield/ > > > https://www.tiktok.com/@battlefield > > > https://www.facebook.com/battlefield/ > > > http://threads.net/@battlefield

9
90
Current build! (lemmy.world)
submitted 9 months ago* (last edited 9 months ago) by SalamenceFury@lemmy.world to c/pcmasterrace@lemmy.world


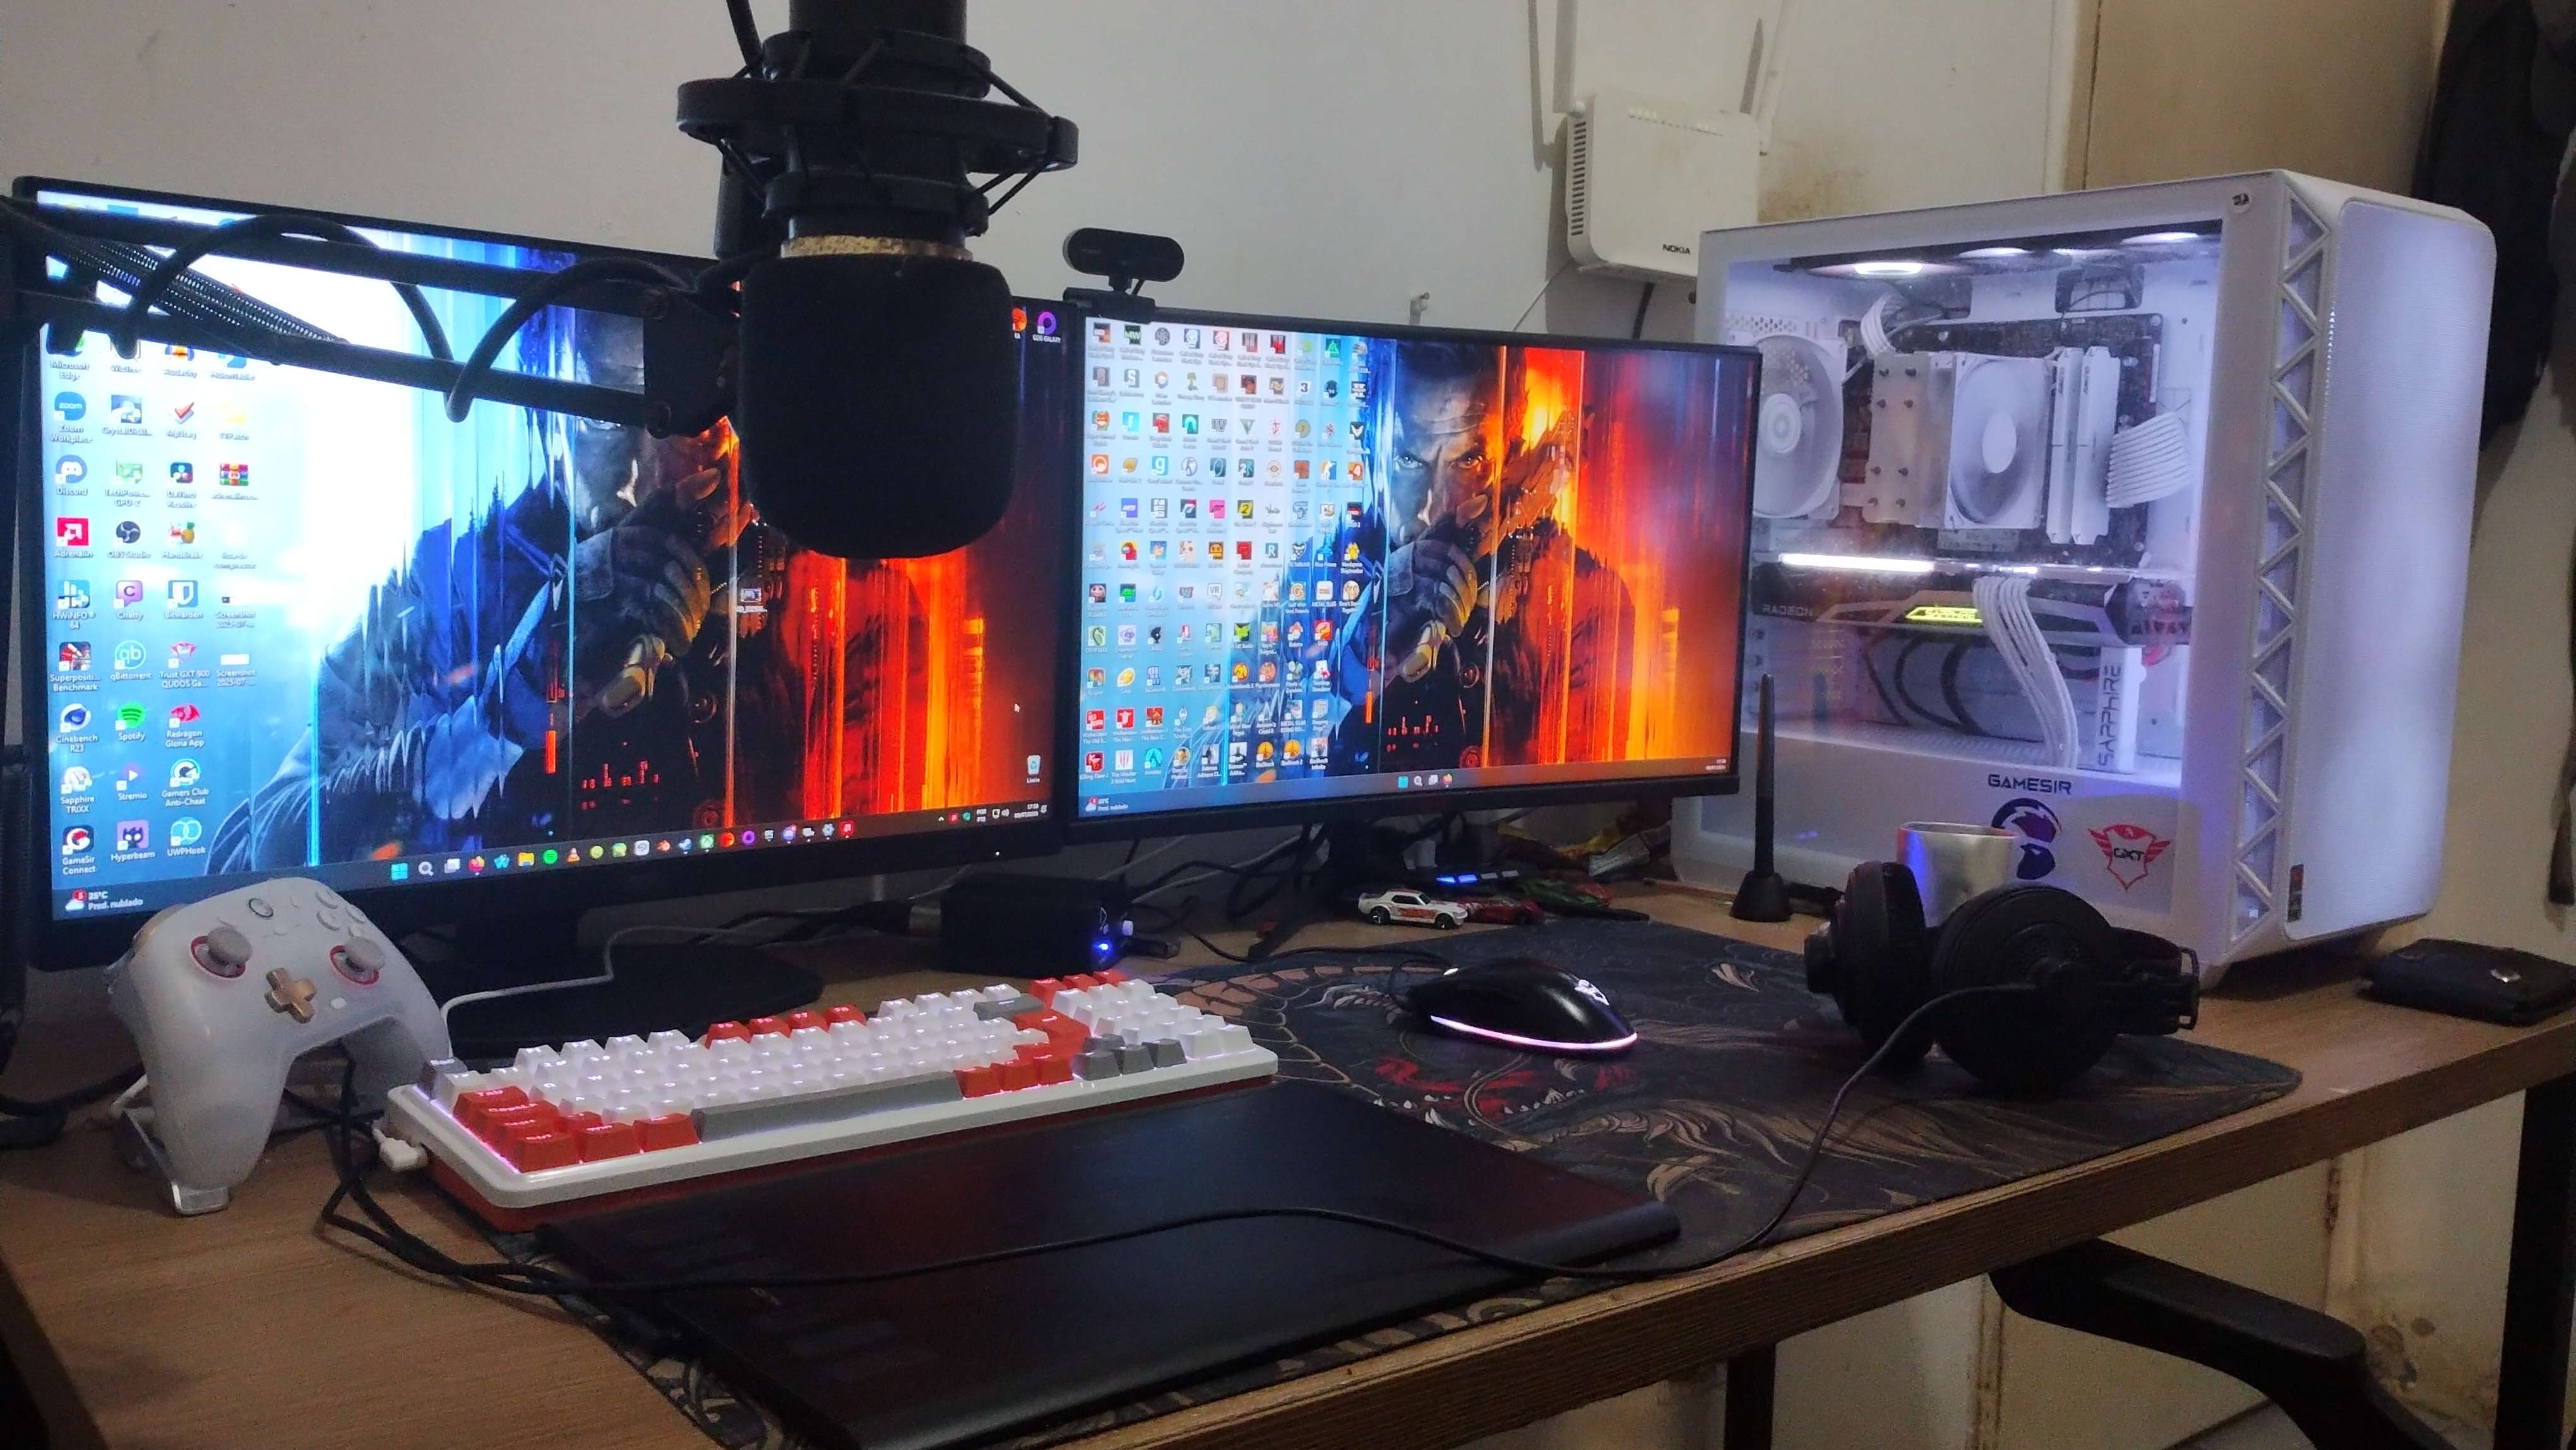
I have always dreamed of having a good computer after years of using very old stuff. Current build has a Ryzen 7 5800X, 32 GB of RAM, and an RX 6700 XT. Recently changed keyboards and also bought a new drawing tablet!

Best thing of all is that this entire build, aside from the peripherals (other than the headphones), the storage, the case, the RAM, and the cooler, was built with used parts. It took me a while of researching and picking up good deals, but I finally have a computer that would make my 25 year old self geeked.

The build itself is this one, altho it does have some things as a placeholder. My motherboard is actually a Brazilian variant of that same one in the list (PRIME B450M-GAMING /BR), the memory sticks are Gloway Tiance IIs that I bought in Aliexpress, and the second monitor (not the AOC one) is a white label one from a Brazilian retailer (Pichau Athen V2 CV24) who shares the same specs and format.

10


According to some benchmarks, some Intel ARC GPUs are better than some AMD ones. However, I have not seen many people actually using them for gaming. Are there any drawbacks when using these GPUs? Should I get an AMD RX 7600 or an Intel ARC B570 for about the same price and why?

11


cross-posted from: https://infosec.pub/post/32005086

When the postie comes, I'll be building a PC for the first time in years. What are the do's, don'ts and tips nowadays?

Obviously classics like RTFM, plan ahead and retrieve any dropped screws are evergreen.

Things I believe are true: tighten your CPU cooler screws evenly (like putting on a car tyre), all screws should be no more than finger tight, build in a dust-free environment.

What about grounding yourself? I remember reading that the danger of this was way overstated and e.g. anti-static wrist straps were a waste of money. Is building in a case that's plugged in (but powered off) enough?

I've seen recommendations to build outside of the case first to test components - is this good advice?

Anything else?

12


I'm hacking together a gaming/fluid simulation pc from a lenovo thinkcentre m700 sff. I've already got everything set up. The problem is that the only riser i managed to find has a 90° bend to the left. (Looking from where the bracket would be.) The problem is that like this my only way to make it fit is to turn the 3060 fans up. With the extra psu powering it under it. With ~7 cm of clearance. (i'll make some stands to hold it properly) What i'm not sure is if it's going to make a big difference that it's going to push hot air downwards. The power supply fan runs continuously and it draws air downwards and out of the back. But i don't know if it will be enough.

What do you think. Is it going to make it get hotter a lot?

13


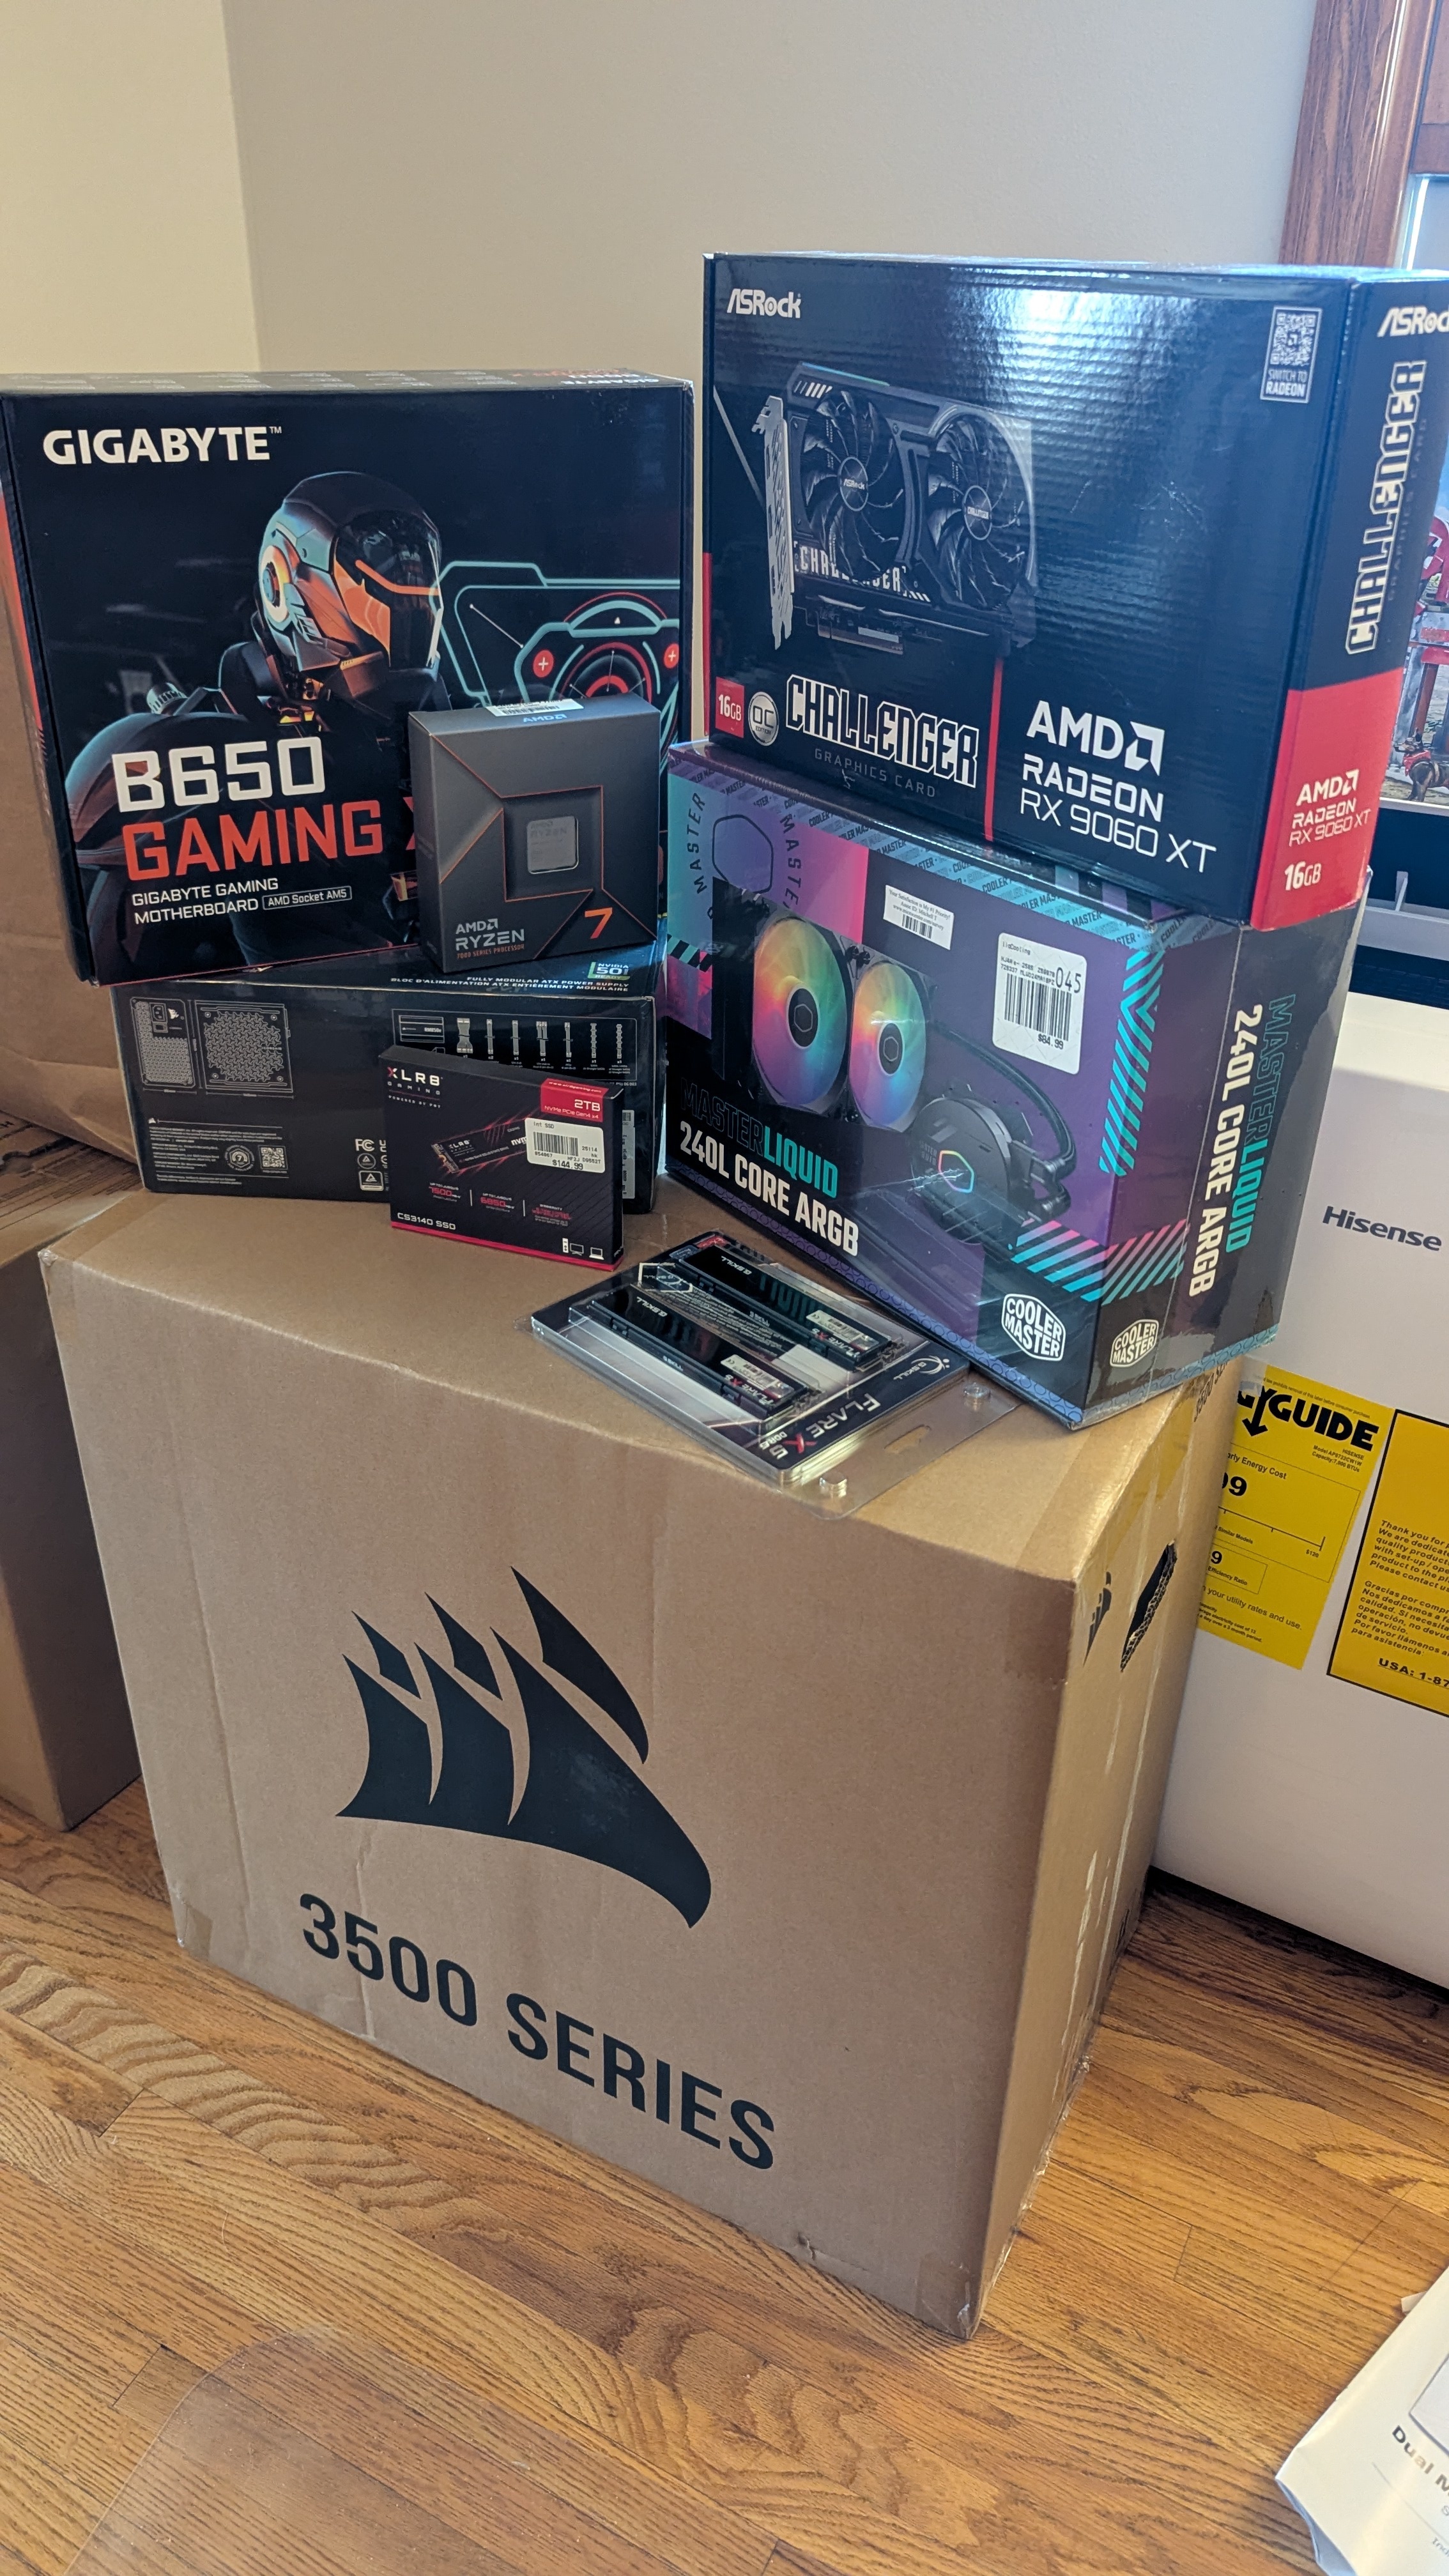
My 2nd build ever and first time building on my own. I was happier than a pig in mud when it power on and posted on the first attempt.

My build (nothing fancy, just for some 1080p gaming):

  • AMD Ryzen 7 7700X
  • 32 GB G.Skill Flare X5 DDR5
  • ASRock AMD Radeon RX 9060 XT
  • Gigabyte B650 X AV V2 Motherboard
  • CoolMaster Master Liquid 240L Core ARGB
  • Cosair RM850e Power Supply (850W, Gold)
  • Cosair 3500X Mid Tower Case
  • 2TB PNY XLR8 NVMe Gen4 M.2 Drive*

*Edited: Forgot to add the storage.

14


Long story short; I bought a pc from a second hand market. It got completely destroyed during shipping. It got covered so no worries there, but im still left with some broken parts I'd like to fix. Among them is this Noctua cooler. This has been heavily bent, is it safe to bend it back again or is it going to require a lot of heat?

Thanks for any suggestions!

UPDATE :

Getting close! Surprisingly easy to vend back fix sone very slowly. Hoping to test it soon.

15


So back a few years ago the SK hynix Gold P31 was the GOAT for laptops due to the low idle wattages and low usage wattages. This allowed you to squeeze about 10% extra battery life out of your laptop.

Is that still considered the best M.2 drives for laptops in terms of power usage?

16
119
submitted 10 months ago* (last edited 10 months ago) by the16bitgamer@programming.dev to c/pcmasterrace@lemmy.world


This has been my reliable Power Supply for my Battle Station from 2018 until now. Today when I turned on my RIG, she didn't post... or do anything.

Tested this PSU on my older Motherboard, it didn't post, and when I took my SO's PSW it did.

I think my RIG will be fine, it was working with my older PSW. But only time (and a new PSW) will tell.

17


I'm looking to buy an RX 9060 XT and was hoping to collect more sources comparing different models. I'm mainly looking for noise & temperature comparisons between the base models available.

So far the best source I found is Techpowerup. They have comparisons for stock behaviour and noise normalised between the 6 models they tested. Sapphire Radeon RX 9060 XT Pulse OC 16 GB Review
Unfortunately, they've mostly tested the huge triple fan designs until now. From the base models, the Reaper has terrible cooling and the Sapphire Pulse unfortunately only offers 1 DisplayPort connector.

Hardware Unboxed also only compares 3 higher end models in their review. AMD Radeon RX 9060 XT 16GB Review, Gaming Benchmarks!

Does anyone have reviews for the other base models, XFX Swift (dual fan) and ASRock Challenger?

18
 
 
19


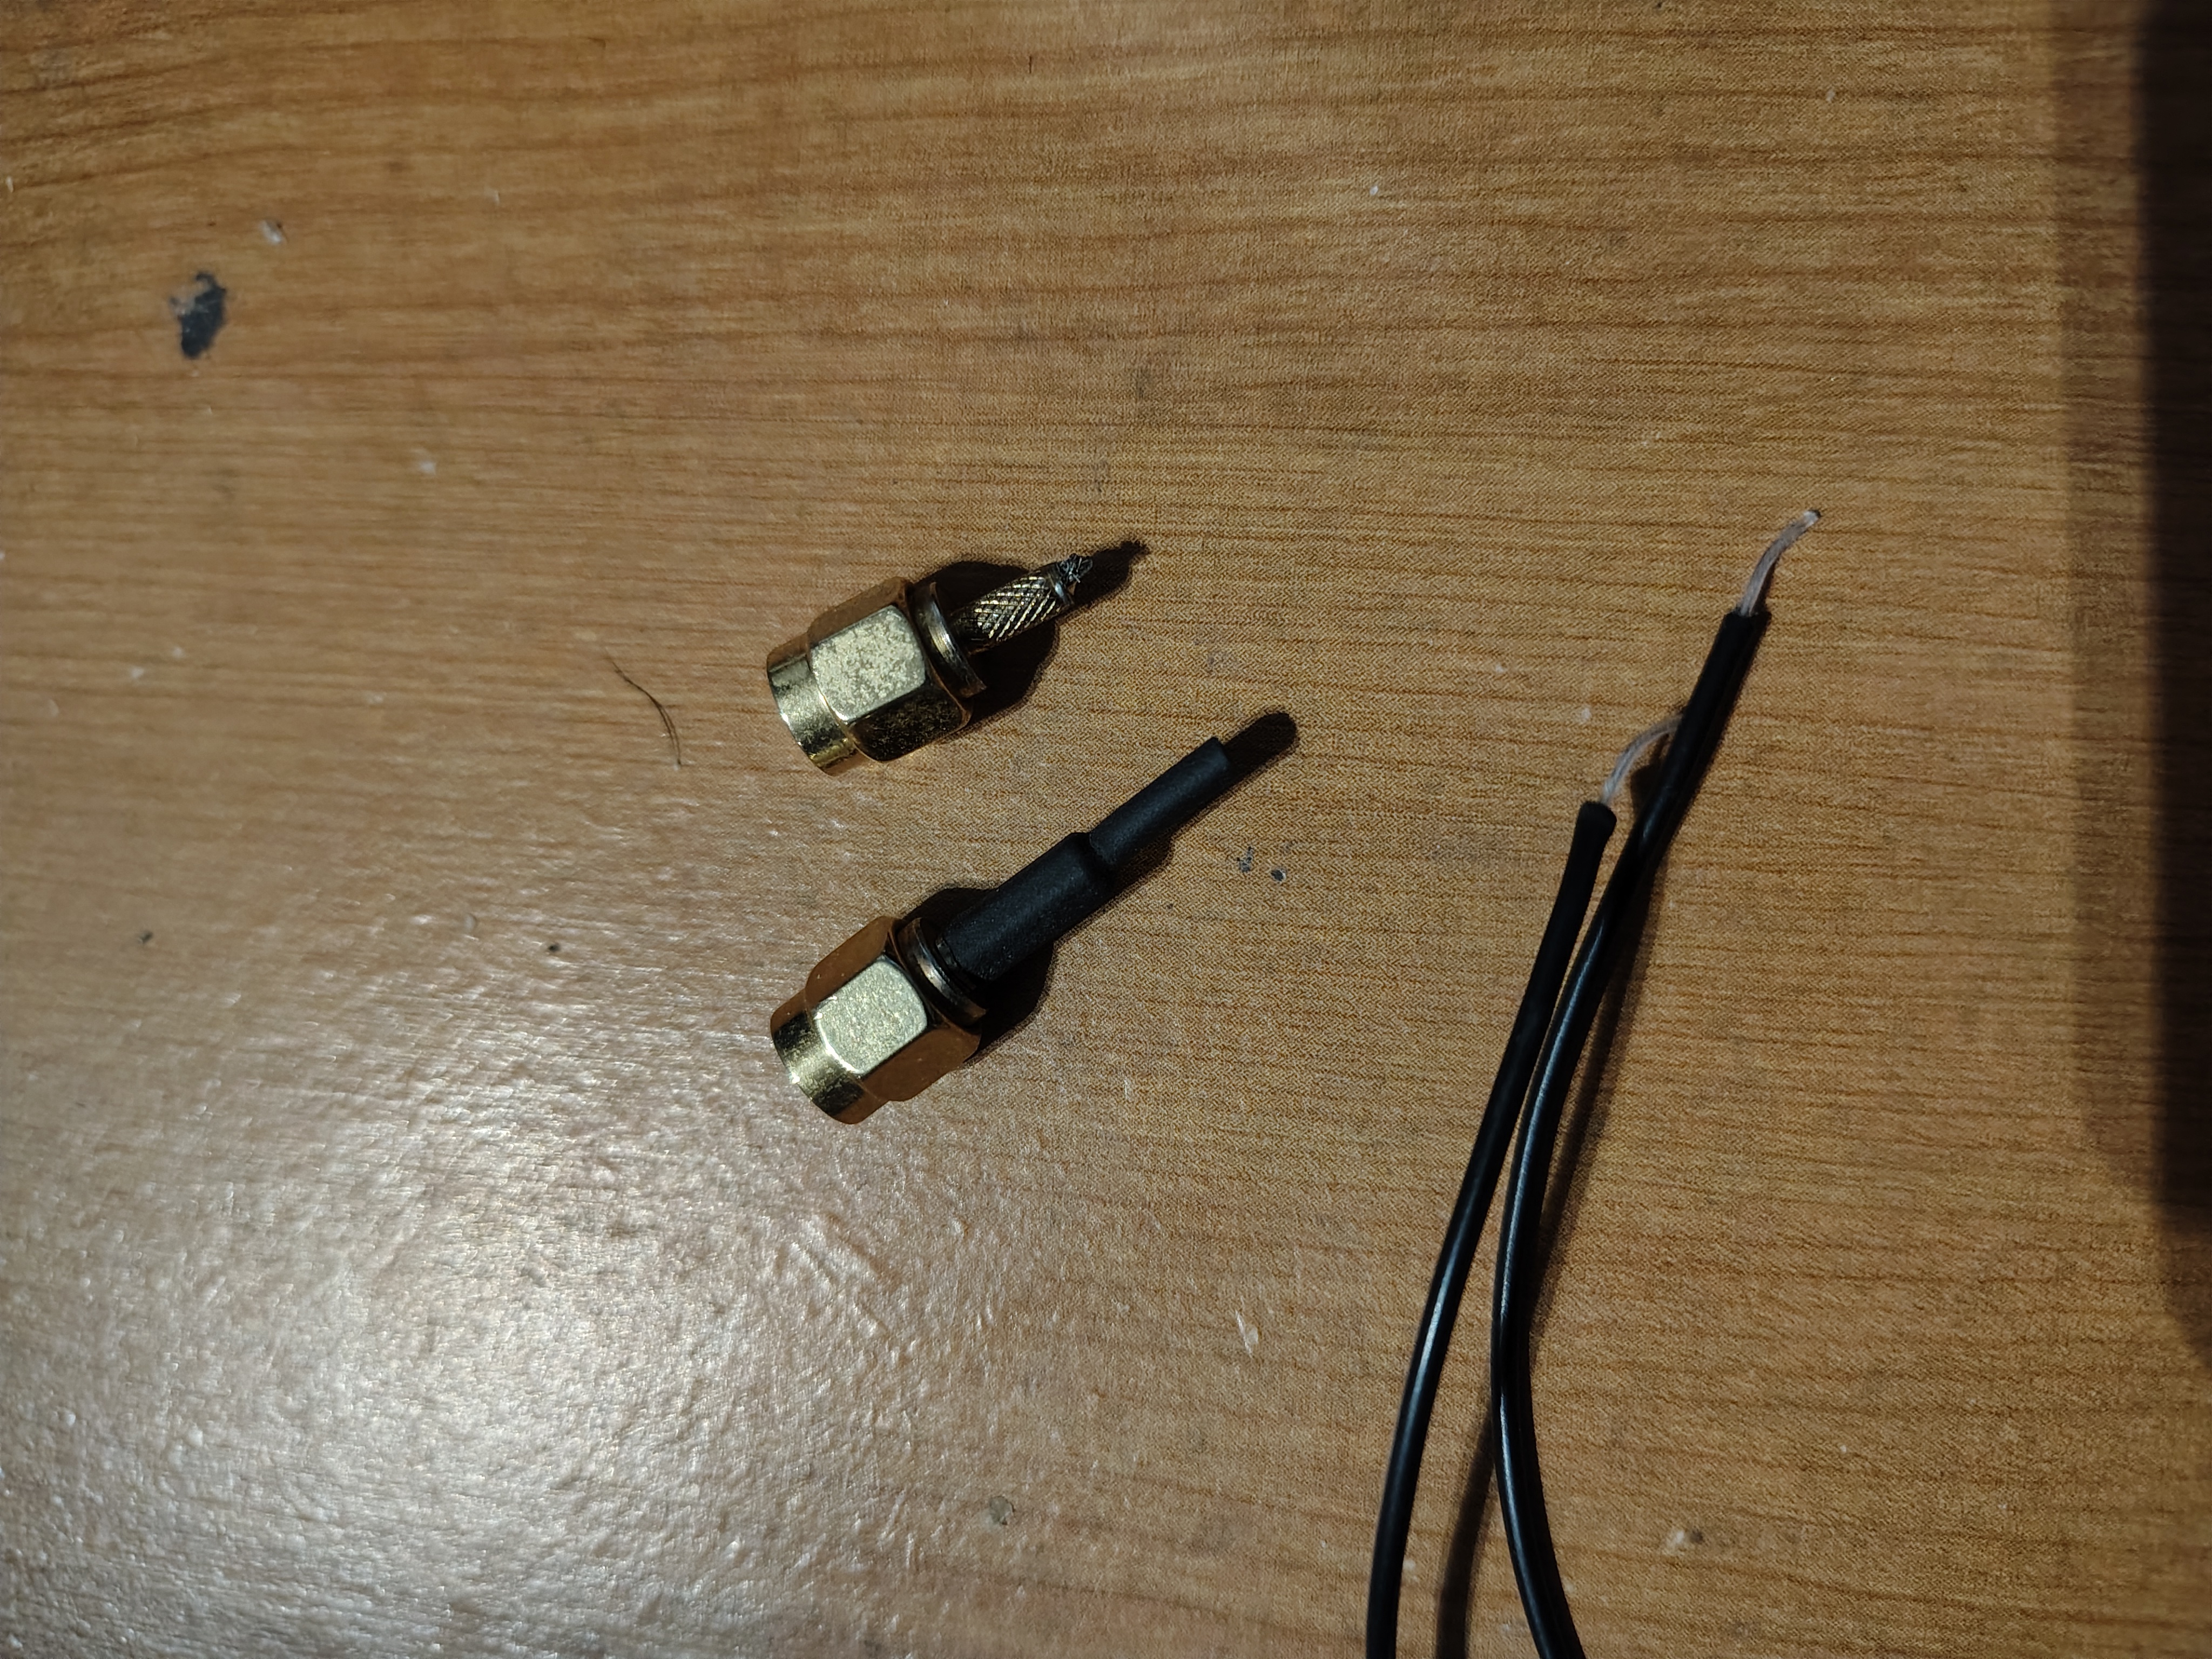
I accidentally moved my PC while the antenna cables were caught on something, leading to them ripping. would I be able to just solder the connector bit to the cable?

20


I've already posted this on a forum on pcpartpicker but no one replyed;

hello everyone tks for clicking on my post. so i have a laptop I've using for 2years now just watching learning video editing by watching tutorials on it and i found out that video editing apps are very demanding specially adobe apps.. my dell latitude 5590 re-brushed i bought for 3000 Moroccan DH (around 300$) ( i5 8th gen / 8gb ram / intel UHD graphics 620) can't run these apps.. so i find myself obligated to build a PC. but i have a low budget so I'm gonna need to buy re-brushed parts. I'm new to this.. I'm asking for your help guys!!

I just wanna build a PC that can run premiere and after effects smoothly for video editing at 1080p I don't edit at 4k so i don't need a super build.

Note: the budget below is just for the PC not the Peripherals too.

  • Budget: 400$ - 600$
  • Location: Morocco
  • Use : video editing (premiere and after effects).
  • Peripherals required (monitor, keyboard/mouse, etc): since it's my first build i need everything the mouse, the keyboard, and the monitor.
  • Operating System required: windows 11 pro.

I want in advance to thank everyone in this forum who give his time in effort to help nobs like me! much respect for you guys!

21


This makes it much easier to set your screen's brightness to a comfortable level at each time of the day, and to save energy.

(For Windows, see the very bottom of this post.)

On Linux, if you currently have no keyboard shortcuts for that available, a good way to create them is via ddcutil. Once you have ddcutil installed, have your displays' properties printed in the command line by typing ddcutil detect.

This should show you a list of parameters for each of the displays you have connected. For a display of your choice, try these commands:

ddcutil -n <Serial number> setvcp 10 - 5 # reduces brightness by 5 %
ddcutil -n <Serial number> setvcp 10 + 5 # increases brightness by 5 %

ddcutil -n <Serial number> setvcp 12 - 10 # reduces contrast by 10 %
ddcutil -n <Serial number> setvcp 12 + 10 # increases contrast by 10 %

ddcutil -n <Serial number> setvcp 10 0 # sets brightness to minimum
ddcutil -n <Serial number> setvcp 10 100 # sets brightness to maximum

If these commands all work, you can create in your desktop environment's settings (e.g. KDE) custom keyboard shortcuts that execute these commands. Personally, with my two displays and with dedicated "Brightness up" and "Brightness down" keys (macros) on my keyboard, I am using combinations with the modifiers Alt to address the secondary instead of the primary display, Shift, to adjust contrast instead of brightness, and Control to set an absolute value (0% or 100%) instead of going by increments.


Further notes:

Instead of addressing your displays via their serial number, you can also address your display via most other parameters shown in ddcutil detect by using another option than -n, e.g. via bus number or manufacturer name, but I've found that bus number is not persistent over the years, and manufacturer name ("Mfg id") may contain spaces which may lead to problems.

A full list of all other possible vcp commands (the numbers after setvcp) can be obtained through ddcutil vcpinfo.

If you're using a laptop, brightness adjustments for its internal screen are of course almost always a no-brainer.


On Windows 10 and perhaps 11 as well, you can apparently do the following:

Step 1: Press the Win + A to open the Action Center.

Step 2: Press Shift + Tab to select the brightness slider.

Step 3: Use the left and right arrow keys to adjust the screen brightness.

22


I'm coming from a Logitech G815.

What I liked:

  • low profile keycaps and body;
  • aluminum body;
  • USB port to plug my mouse into it instead of into the PC;
  • backlit;

What I disliked:

  • switches (presses would register way before feedback);
  • proprietary app for macros, and other configs;

What I'm looking for:

  • mechanical tactile/clicky;
  • backlighting (through the keycap, as I need to see the keys I'm pressing);
  • smaller form factor but with tenkey;
  • shipped to and from EU;
  • wired;
  • US international layout;

What I'd like on top, but I can compromise:

  • low profile keycaps and body;
  • RGB backlighting;
  • aluminum body;
  • adult/sleek design;

Usage will be gaming (no competitive) and a lot of typing. Budget is the main problem, as I'd like to spend no more than 100-125€ but can stretch it to 150€ if it means having more criteria met.

What I looked at so far: Logitech, but the prices aren't quite there and I wasn't happy with the G815's switches; Keychron, but most of them don't seem to have lighting that goes through the keycaps?; Akko, seem to have the same "issue"; Monsgeek, seems to be more niche stuff and I can't find a small + 10key form factor.

Thanks in advance!

23


Left is idle, right is under full gaming load (Helldivers 2). My previous rig (Intel) easily went up to 85-90°C in the same circumstances. Ambient temps are slightly elevated as well since we've been having ~30°C temps daily here for a while now.

To me this is almost ridiculous. I had never dreamed I could get my temps under load under 70. CPU is at stock speed since there is literally no reason to push it any further at this point. Can always choose to up the clocks later if I still want to.

Cooler is a Noctua NH-D15 G2. I don't see myself returning to watercooling any time soon. And Noctua has a new customer for life.

24


I have a 3DConnexion Spacemouse. I bought it, and use it, for CAD work, but I'm drunk enough to think it'd be fun to play Satisfactory with. What do you think I'd need to do to map it to a controller or something? Am I gonna have to fuck around with the Python library? It's been awhile since I've fucked around with a Python library.

25


I have an MSI MAG x870e Tomahawk WiFi mobo, and the temperature LED is just, like, SO bright.

I don't see an obvious way of changing its brightness or turning it off in the BIOS, so I'm thinking of cutting a 1"x0.5" rectangle of ND-8 photo gel and electrical taping it to the light.

Anyone know of a better way?

view more: next ›